Recipes

Monday, June 27, 2011

Chicken Afritada

Copyright 2011 LtDan'sKitchen blogs
Chicken Afritada is one of the Spanish inspired dishes that have been adapted in the Filipino cuisine and has been made truly Filipino. It is a staple in most celebrations and can be prepared using pork or a combination of both. My initiation to the process of learning how to cook this dish came courtesy of living in my Aunt's house during the weekends while going to college in Manila. My Aunt lived a couple of hours away from where I went to college and this dish was something they cook regularly when I visit. The other dish that seemed to be a favorite of their family was a stew of vegetables cooked in fermented fish sauce. I had the chance to learn how to make both but it was a carefully monitored training and only when I passed the taste test was I allowed to make both dishes regularly without supervision.

Since this dish is a tomato-based stew, it is best served with a steaming mound of white rice. The good thing about this dish is that is is fairly simple to make and can be easily scaled up which makes it convenient when cooking for a big crowd. I tend to cook this dish in big batches to save me time during the week and it does keep very well in the fridge. I also prefer it a bit thick but you can adjust accordingly by adding more broth or more tomato paste to suit your taste.

Chicken Afritada

2 lbs chicken, cut up into large pieces
2 lbs potato, peeled and cut into chunks
1 large green bell pepper
1 large red bell pepper
1 small onion, diced
2-3 cloves garlic
1 16-oz canned diced tomato
1/2 cup broth
3 tbsp tomato paste
salt and pepper
2-3 tbsp vegetable oil

1. Heat the vegetable oil over medium heat. Fry the potatoes until it  
    forms a crust. It does not need to be completely cooked. Set aside.

2. Saute the garlic and onion until softened. Add the chicken pieces and  
    season with salt and pepper. Brown the chicken pieces on both sides. 

3. Add the tomatoes, broth and cover to simmer. Lower the heat and  
    simmer for 30 minutes more. Check the chicken for doneness and  
    adjust the flavor as needed. 

4. Add the potatoes and cook until fork tender. Add the peppers and  
    cook until just tender.

5. Add the tomato paste to thicken the sauce and check for flavor.  
    Adjust accordingly.

Sunday, June 26, 2011

Galloping Figs

Copyright 2011 LtDan'sKitchen blogs
This post took four years in the making. I learned of this recipe in 2007 during the first season of Lidia's Italy and I have been hooked ever since but I always either miss the season when figs are available or I just forget about this recipe altogether. The first time I saw this episode of Lidia's Italy, I missed the first few minutes so by the time I had the television on, the galloping part of the recipe was already happening. To my dismay, finding the recipe was an even harder task but I'm glad that it is available in the accompanying cookbook of the show. 

Today proved to be fortuitous as I managed to find ripe figs in the grocery store and I got really excited. I have no reason to splurge on them but I guess now is the time to finally give this recipe a go. I don't want this to be another recipe that got away from me. I usually tweak the recipes I use but I'll try to stick to the recipe as faithfully as possible. This won't be too hard as the steps in making this fig sauce are very basic and simple. I'm definitely looking forward to hearing the galloping sounds which is why the dish is named as such. 

As a side note, the  reheating step after the figs have cooled down for an hour is a very tricky step. The recipe calls for another 30 minutes of simmering but by the time the figs have cooled down, the syrup is already quite thick and will be prone to burning. I therefore kept the heat to a low and kept a close watch on how the figs were going along. You can decide on how thick you want it but I wanted my figs quite on the thick side as you can see from the picture below. 

*Galloping Figs - Adapted

2 lbs ripe figs
1 cup white sugar
1/2 cup water
3 tbsp lemon juice
2 bay leaves
strips of lemon zest

Copyright 2011 LtDan'sKitchen blogs
1. In a deep saucepan,  
    melt the sugar in the  
    water and lemon  
    juice over low flame. 
    When the syrup starts  
    to bubble, arrange  
    the figs (slice off the 
    tips) in the pan and  
    make sure that they  
    are quite snug. 

2. When the figs start 
    to release their  
    juices, add the bay leaves and the lemon zest and start to increase  
    the heat to medium until the pan is bubbling steadily. Cover and
    let it bubble for another 30 minutes or until the figs have softened. 

3. Turn off the heat and let the figs cool for about an hour.  The figs will 
    shrink in size so don't be alarmed.

4. Reheat the figs and let it steadily bubble at low heat. Simmer until  
    the syrup gets thick. Cool to room temperature and serve over a   
    bowl of ricotta cheese or vanilla ice cream. 

Copyright 2011 LtDan'sKitchen blogs
So after about 4 years and two hours later, I finally get to taste the galloping figs over softened vanilla ice cream. My other dilemma now is when to try it paired with ricotta cheese. I guess I'll know by tomorrow. All I can say right now is that it is definitely worth the wait. As for the verdict, well, it tastes like jam but not as sweet and the tartness of the fig balances well with the sweetness of the ice cream. Definitely a keeper!
   
* Bastianich, L.M., Manuali, T.B., Lidia's Italy: 140 Simple and Delicious Recipes from the Ten Places in Italy Lidia Loves Most. Knopf Doubleday Publishing Group. New York: 2007

Friday, June 24, 2011

Blackberry Chocolate Ruffle cake

Copyright 2011 LtDan'sKitchen blogs
For my birthday early this year, I made the choice to treat myself to something more challenging in terms of baking a birthday cake for myself. For this to happen, there is this one cake that I've always wanted to bake but never had the guts to go for it. I've made the mistake of making a 14-layer cake for a friend once (not the choice of baking him a cake, just the choice of the cake) but that was nothing compared to this cake I had in mind, the Raspberry Chocolate Ruffle Cake.

Why was this a challenge? Well, for one, there are so many techniques involved in creating this masterpiece that I had to convince myself it was worth a try and that I can do it. The presentation of the cake depended on making chocolate ruffles so there is the first challenge for me. I have no experience when it comes to making forms out of melted chocolate except to make truffles (which is a no-brainer) nor do I have all the right equipment to do so. The second challenge is finding the right tool in making the chocolate ribbon. I finally settled on using a plastic kitchen liner so that was an easy fix to this problem. Third, I needed to make crème fraiche. I've tried different versions of crème fraiche recipes before but it usually takes days before I can get it to the right consistency. I decided to follow what was given in the recipe and it actually took me only one day to get it right so that is another problem solved. Suffice it to say that I just bit the bullet and took the chance on the ruffles and it came out quite good. Raspberries were not in season when I made this cake so I used blackberries instead and the overall result was still amazing.

Copyright 2011 LtDan'sKitchen blogs
I have the full recipe in my book but this cake was actually shown on TV in Julia Child's PBS show Baking with Julia. I'm enclosing the link to the recipe which also includes a video on how to make this cake. If you have the time and the chance, I say go for it. It is definitely worth the time and the stress but you end up with a truly wonderful cake that is actually very light in texture despite how heavy it looks with all the chocolate pieces that surrounds it. I will definitely have to give it another go this summer. Bon appetit!

Beef and Mixed Mushroom Stew

Copyright 2011 LtDan'sKitchen blogs
I've made this beef stew a number of times and it always turns out great. The first time I ever made it was to celebrate the graduation of a friend's daughter. As suggested in the recipe, I served it with wide egg noodles but I've also served it with rice pilaf, plain rice and french bread and it was still a great pairing. The other thing that I like about this dish is that it is versatile enough that you can exchange the mushroom with pearl onions if you so desire. Or, another option is to use both which I've also done as well. The cooking process is a bit involved but the stew is definitely worth the effort. I encourage you to give it a try.

Beef and Mixed Mushroom Stew - Adapted*

1 package dried porcini mushroom (½ oz)
2 lbs beef for stew, cut into 1½  inch chunks
2 tbsp vegetable oil
1 lb mushroom (cremini) or pearl onions
1 large onion, diced
2 garlic cloves, minced
4 tbsp tomato paste
1 cup chicken broth
¾ cup dry red wine
2 medium carrots, diced into large chunks
salt and pepper
¼ tsp thyme
bay leaf
chopped parsley (for garnish)

1. Reconstitute the porcini mushroom in 1 cup boiling water for about  
    30 minutes. Set aside. 

2. Pat the meat dry with a paper towel and set aside. 

3. In a large pot, heat the oil at medium high heat and add the  
    mushrooms (or onions) and cook for about 10 minutes until  
    lightly browned. Transfer to a bowl and set aside. 

4. In the same pot, brown the meat on all sides. Do this in batches and  
    add more oil if necessary. Transfer the meat to another bowl and set
    aside.

5. To drippings in the pot, add the garlic, thyme, bay leaf and diced  
    onions and lower the heat to medium. Cook until the garlic and  
    onions are lightly browned. Add the red wine to deglaze the pot.
    Let it simmer for about a minute.

6. Return the meat into the pot. Add the chicken broth, the liquid used  
    to reconstitute the porcini (strained through a sieve) and the tomato  
    paste. Heat to boiling and let simmer covered for two hours or until
    the meat is tender.

7. Add the mushrooms (softened porcini and cremini), carrots and  
    onions if using and check for flavor. Simmer for 30 minutes more  
    and adjust the flavor accordingly. If desired, you can also skim off  
    the fat depending on how fatty the cut of beef that you used. 

8. Garnish with chopped parsley and serve with your choice of pasta or
    rice. 

* Good Housekeeping Step-By-Step Main Dishes: Hearst Books, New York,1999

Monday, June 20, 2011

Acorn Squash in Coconut Milk

Copyright 2011 LtDan'sKitchen blogs
Sauteed vegetables are quite common as a side dish to the numerous meat dishes in a Filipino meal. It usually involves sauteing any green leafy vegetables with garlic and onions and seasoning with soy sauce, fish sauce or even shrimp paste (depending on the region). Cooking in coconut milk though is something not very traditional in the region where I grew up at. However, we do enjoy a few dishes cooked in coconut milk specifically a stew of fresh water snails and yams that my mom makes to name one. 

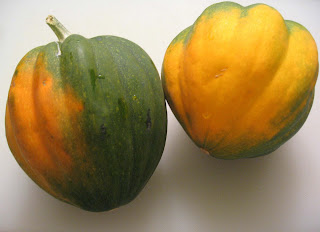
Sauteed squash cooked in coconut milk is something I learned while living in the US with friends who grew up from other regions of the Philippines. I actually grew to love it for several reasons: one, it is a healthy dish and two, it is very easy to make. The only tricky part is peeling the acorn squash (I've nicked myself a couple of times doing this) which is what I prefer to use for this dish. If you feel like skipping this part though, you can always buy the pre-cut version available in select grocery stores.

Copyright 2011 LtDan'sKitchen blogs
Why acorn squash? Well, the texture and flavor are very similar to the squash that we have back home. I have used a variety of winter squashes including but not limited to the butternut squash but the flavor always seems off. So I stick to the acorn squash which I think has the right sweetness and the firm texture to counter the slightly strong flavor of the coconut milk in the dish. I use very minimal flavoring allowing the squash to be the star of the dish which in itself is quite good. Additional greens are added in the form of green beans and spinach leaves which further adds to the nutritional value of the dish.

Acorn Squash in Coconut Milk

Copyright 2011 LtDan'sKitchen blogs
2 lbs acorn squash, peeled,   cored and sliced into   chunks
2-3 cloves garlic
1 medium onion, diced
1/2 lb green beans, cut in   half
2 lbs spinach leaves
1 16oz can coconut milk
1 cup broth (your choice)
salt and pepper
3 tbsp olive oil
1 bulb garlic, peeled and   sliced thinly and toasted* (to garnish)

1. Saute the garlic and onion in olive oil over medium heat. 

2. Add the squash and season with salt and pepper. Add the broth and  
    half of the coconut milk and simmer for about 10 minutes. Check  
    regularly to make sure the squash is not getting overcooked. 

3. Add the green beans and simmer uncovered until it turns bright green.

4. Add the spinach leaves and cook until wilted. Add the rest of the  
    coconut milk and adjust the flavor with salt and pepper.

5. Garnish with toasted garlic.

* To toast the garlic, heat 3 tablespoons of light olive oil over low heat and add the garlic. Toast until the garlic turns golden brown. Drain the toasted garlic on a paper towel and use the garlic infused oil to cook the dish. Spinach is also optional if you are not too fond of it and the dish can stand on its own without it.

Sunday, June 19, 2011

Lumpiang Shanghai

Lumpia was something I love to cook ever since I was old enough to help prepare the food for family celebrations like my parents' Anniversary party every April or every fiesta which also happened to be my Mom's birthday. I always made sure we have lumpia. Lumpia or spring rolls can take form in a lot of ways. A common version is made with cooked ground meat and shredded vegetables wrapped in a rice crepe and deep friend until golden brown. Another similar version is named the Shanghai, a version from the city of which this spring roll was derived and named from. This version is a bit quicker to prepare with very minimal ingredients in comparison to other spring rolls plus it also freezes well. Another advantage it that the meat used for the dish can be interchanged from ground pork to ground chicken or turkey. It even works with canned tuna. Served with sweet chili sauce, this dish is perfect as an appetizer or served as a main dish together with steamed rice. 

Pork Lumpiang Shanghai - Pork Spring Roll Shanghai style

1 lb ground pork
1 onion, grated
2-3 gloves garlic, finely minced
2-3 medium sized carrots, grated
1/4 cup chopped cilantro
salt and pepper
1 large egg
1 packet square spring roll wrapper (20 wrappers)

1. Mix all the ingredients in a bowl and season with salt and pepper. To  
    check for flavor, take a teaspoon of the mixture and cook in the  
    microwave until the meat is cooked. Adjust the flavor as needed. 

2. Take 2 tbsp of the filling and lay on the one edge of the wrapper as a  
    tube. Roll as you would a leaf of tobacco and seal the edges with  
    water. 

3. Cut the filled wrapper into 1 1/2 inch size rolls using a sharp knife  
    or a kitchen shear. 

4. Cook in a preheated oil at medium heat until golden grown. Drain on  
    paper towels as you prepare to cook the rest of the lumpia.

5. To freeze the extra rolls, lay them individually on a baking sheet  
    and freeze until solid. Store in a freezer bag and store until  
    needed. To cook frozen lumpia, thaw for about 5 minutes on a
    baking sheet. Cook in preheated oil at medium heat. 

Puchero

Copyright 2011 LtDan'sKitchen blogs
Puchero is a Sunday dish my Mom used to make for the family as a Sunday lunch meal. We would go to mass at 7am and after mass, we go straight to the market to buy what we will need to prepare for lunch and the rest of the week. I have always loved going to the market as a child with all the different sights and smells to savor. The meat section will smell strongly of freshly butchered meat while the seafood area was always wet and muddy. There is also the area where they sell street fare and a favorite of mine is the halo-halo which is why it is no wonder I was fat as a child (or maybe I was just born fat).

We seldom buy meat for the fact that my Dad has certain unexplained allergies to them so we were stuck with fish which was okay by me as well. Every now and then though, we will have a meat dish especially on Sundays and it is always a highlight of the week for the family. This version of puchero is the only one I knew growing up and it was actually quite a surprise for me to learn later on in life how different it is compared to versions offered in restaurants. My Mom's puchero is earthier and more basic but will definitely satisfy anyone who yearns for a home-cooked meal. She even takes it a notch further by cooking the stew in a clay pot fed with charcoal and chopped wood which I thinks adds another dimension to the otherwise simple flavor. I'll have to cook mine on a glass top electric stove though.

In honor of my Dad this Father's Day weekend, I'm offering my Mom's pucehro, one of my Dad's favorites.

Puchero ala *Lagring

2 lbs pork, cut into chunks
1 onion, diced
2-3 cloves of garlic, minced
2-3 bay leaves
2 tbsp olive oil
4-6 cups water
2-3 medium sized carrots
1 lb cabbage, cored and chopped into large pieces
2 medium sized yams
2 pieces plantain bananas (almost ripe)
salt and pepper to taste

1. Saute the garlic and onions in the olive oil on medium heat. Add the  
    bay leaves and saute until they release their aroma.

2. Brown the pork in the saute mixture and season with salt and pepper.

3. Add the water and let it simmer for about 40-50 minutes. Add the  
    carrots, yams and bananas and simmer for another 20-30 minutes.

4. Check for flavor and adjust accordingly. Add the cabbage and let it  
    cook for a minute or two until just tender. Serve with white rice.

I like to keep my stew a bit thick so I use less water. It concentrates the flavor more and you end up with a very good broth to slurp on. Also, make sure that you chop the vegetables the same size as the meat.

* Lagring is my Mom's nickname to her friends.

Erratum

Copyright 2011 LtDan'sKitchen blogs
Folks, it finally came to pass. My greatest fear when I started this blog was that I might make a mistake in my post and cause somebody to make something less than perfect and because of a simple omission on my part. On the chocolate cake post, I wrote 1 stick butter and alongside it, 8oz as an equivalent amount. Unfortunately, I meant 8tbsp for each stick of butter which corresponds to 4oz. Sorry for this.

Also, as stated in the same post, the caramel has to be perfectly cooked before it can be used as a filling. To prove my point, I just made a fresh batch so that everyone will know what it should look like.
 

Saturday, June 18, 2011

Potatoes au Gratin

Copyright 2011 LtDan'sKitchen blogs
Side dishes I believe are equally important as the main dish and I always try to find the right dish to complement what I plan to serve for dinner. A favorite of mine is rice pilaf but in some cases, a potato dish is the more appropriate accompaniment. Using a very basic recipe of potato gratin, I've tweaked it to suit my tastes and my needs. 

Potatoes au Gratin

3 cups thinly sliced potatoes
6 tbsp unsalted butter
3 tbsp all purpose flour
11/2 cup milk
1/2 cup sharp cheese (I prefer Pecorino Romano or Parmigiano Reggiano)
¾ cup soft bread crumbs
1 tsp chopped herbs (parsley, thyme or herbes de provence)

1. Melt 3 tbsp butter and blend in the flour. Add the milk gradually and
    cook, stirring, until smooth.

2. Add the potatoes and cook until the milk mixture has thickened.

3. Add half of the cheese and stir until melted and pour the potatoes  
    into a 9x13 baking dish. Melt remaining butter and mix with the  
    crumbs. Sprinkle over contents of baking dish and cover with
    aluminum foil.

4. Bake at 375°F for about 45-60 minutes. Check to make sure that the
    potatoes are tender. Remove the foil and sprinkle the remaining
    cheese and herbs and bake until the top is golden brown.

Peaches

Copyright 2011 LtDan'sKitchen blogs
I grew to love peaches quite late although I still have a love/hate relationship with the fruit. The first time I had them was when I was about 7 years old. My uncle who works for the customs brought us a couple of canned peaches as a present for the family and everyone loved them except for me. To me, they were slimy and nasty and reminded me of snot so I spat it out. It was not until I was in high school when imported canned fruit cocktail invaded our grocery stores that I was reintroduced to them. By then, I have overcome my prejudice and through peer pressure, I grew to love them. During my time in Atlanta, the capital of the peach state Georgia, peaches were in abundance but I could never find the right time to buy them when they are gloriously ripe. You either find them too young or too ripe. The only time I ever bought fresh peaches that were perfectly ripe was in Florida but even then, that single moment of luck was never repeated.

Peach Cobbler or Peach Melba are probably the two most common ways of using peach in a dessert but I am more partial to Peach Charlotte Russe or Peaches and Cream. Both desserts are fairly similar since the latter was derived from the former as my way to present the dish in the more familiar cake form. Peach Charlotte is very similar to the Mango Ice Box cake from back home where the cake base are ladyfingers sandwiched by a cream-based frosting and slices of fresh fruits (be it peaches or mangoes). The discovery of the Charlotte came about due to my frustration with the mangoes available here in the US. Most come from Mexico and although they look similar, the flavor and texture are quite different. You always end up with something that is very stringy and is never sweet, definitely not suitable for making cakes unlike their counterparts back home. The closest and most available substitute for this elusive ingredient is the canned peach.

Copyright 2011 LtDan'sKitchen blogs
Charlotte Russe is usually assembled in a springform pan to form a round cake using precisely pieced ladyfingers and surrounded by more ladyfingers in a picket fence design, sometimes tied with a ribbon to finish off the cake. The parts of the cake are held together by a cream custard mousse and flavored with fresh or canned peach slices. It is very much an Easter or a spring cake. I personally don't do it this way since it is a bit too frou-frou and instead opting a simpler version by assembling it in a 9x13 baking pan. If you intend to give it away as a gift though, I think that the original form of the cake will be the perfect way to present it. I just think that without the ribbon, this whole cake will fall apart so I never make it as such.

Copyright 2011 LtDan'sKitchen blogs
Peaches and Cream came about as my way to translate the flavors of the Charlotte but in cake form. Since I need more stability for the cake, I prefer to use a sponge or a chiffon cake as the cake base with pastry cream as the glue that holds both the cake and the fruit filling together. I use the same cream custard mousse to finish off the cake and the overall effect is similar to that of another favorite from back home, the Crema de Fruta cake. As a side note, for those who have access to really good mangoes, switch out the peaches for the mangoes and I think you will have a winner for your next dinner party.

*Charlotte Russe with Peaches - Adapted

1 envelope unflavored gelatin
1 cup milk
4 eggs separated
½ cup sugar
¼ tsp salt
¼ tsp vanilla extract
2 cups heavy cream, whipped
2 batches of ladyfingers, recipe follows
2 32 oz canned peach slices

1. To make the cream custard mousse, soften gelatin in milk on top of a
    double broiler.

2. Beat the egg yolks and add to milk together with ¼ cup sugar and the
    salt. Cook over simmering water, stirring constantly, until mixture is
    thickened and smooth. Stir in vanilla. Cool, stirring occasionally to
    prevent crust from forming.

3. Beat egg whites until foamy. Beat in the remaining sugar, 1 tablespoon
    at a time.

4. Fold egg whites and 2 cups whipped cream into the custard mixture.

5. Arrange a tight layer of ladyfingers in a 9x13 dish. Pour ¼ of the
    custard mixture and top with peach slices. Level the peach slices with
    another layer of the custard mixture. Repeat the process until you end
    up with a top layer of the custard mixture.

6. Keep cool in the fridge until ready to serve.

**Ladyfingers - Adapted

4 egg whites, large
2/3 cup of sugar
4 egg yolks, large
7/8 cup scant all purpose flour
1/2 tsp baking powder
1 tsp vanilla extract

1. Preheat oven to 350°F. Line two 17-inch-by-l2-by-4-inch baking sheets
    with baking parchment. Fit large pastry bag with a plain 1/2 inch
    round tube.

2. Place egg whites in bowl of electric mixer and whip until soft peaks  
    start to form. Slowly add 2 tablespoons of the sugar and continue to
    beat until stiff and glossy. Transfer to another bowl. Add yolks to  
    mixer bowl and stir in remaining sugar. Whip until thick and very pale
    in color and remove bowl from stand.

3. Sift flour and baking powder together onto a sheet of wax paper.  
    Fold half the egg whites into the egg yolk mixture. Fold in the flour,  
    and then fold in the remaining egg whites. Add the vanilla and mix  
    just until incorporated. Transfer mixture to pastry bag and pipe out  
    onto prepared baking sheet. Bake for 8 minutes or until the tops are
    golden brown.

Peaches and Cream

Copyright 2011 LtDan'sKitchen blogs
To prepare this cake, I made sponge cake and baked the cake in a 9-in round baking pan and I also used pastry cream flavored with 2 tbsp of rum using the recipes from joyofbaking.com. I also used one recipe of the cream custard mousse as detailed above to frost the cake. To assemble, cut the cooled cake in half crosswise and take the lower layer as the base and spread with half the pastry cream and top with the peach slices. Top with the second layer and repeat the process. Cover the sides with the custard frosting using a spatula and pipe the remaining mousse into rosettes on both the top and lower edges of the cake. Let cool for at least two hours before serving.

*Women's Day Encyclopedia of Cookery Volume 3, Fawcett    Publications, Inc., New York, 1966

Tuesday, June 14, 2011

1000 views

Copyright 2011 LtDan'sKitchen blogs
My blog had just reached a milestone. I have had 1000 views since I started and I figured it is time to celebrate this moment somehow. After all, I never thought that I'd last this long but I did. With about 40 posts and probably about 60 recipes, that's not too bad. This definitely deserves a donut or two! Or maybe, it is time to give in to my urges and indulge in a log of Brazo de Mercedes (arm of Mercedes), a truly macabre-named dessert but is sinfully delicious (see picture).

Thank you to those who keep visiting my blog and here's to 1000 more views and maybe even more recipes. 

-Dan

Sunday, June 12, 2011

Trout and Chips

Copyright 2011 LtDan'sKitchen blogs
Cedric went fishing a couple of weeks ago and he gave me most of his catch to cook for dinner. Their main catch was brook trout and a couple of rainbow trout. Fresh from a pond close to town, it does not get any better than this. Trout is actually something new to me as the only pond fish I ever learned how to cook is the tilapia. However, unlike the tilapia, trout is very slimy when fresh. It feels almost salamander-like and the scales are very fine. The flesh is slightly pinkish when cooked similar to that of salmon and is quite tasty. It is usually filleted and pan fried in butter but being an Asian, losing the head and the bones is short of sacrilegious to me. So both stayed and the fish was cooked whole. 

Copyright 2011 LtDan'sKitchen blogs
Inspired by one of the probably most common food in Britain, I made my own version of fish and chips. The fish part are the trout seasoned with salt and pepper and coated with cornflour before pan frying in butter and olive oil. The chips are homemade fries of both regular potato and sweet yams. Seasoned simply with salt and pepper and a bit of paprika, it went well with the fish. To balance the flavor, I made a bastardized version of tartar sauce which I prefer over the original recipe. All in all, it was a simple and satisfying dinner.

Friday, June 10, 2011

Weekday French-Italian Dinner

Copyright 2011 LtDan'sKitchen blogs
We had friends over for dinner last night. Nothing special really (except for those who were invited) but it was a dinner planned as a thank you to Jesse for helping me move my larger furniture into the new place and to have additional friends come over and join us for dinner as well. Being it a weeknight, I had to come up with a menu that was easy to prepare without sacrificing the quality and the flavor. Racking through my recipe sources, I decided to start with a warm soup and Escarole and White Bean soup (I was torn between Lidia and Giada's versions of the dish) seemed like a good idea until I realized that escarole is not available right now in my local grocery store. In the end, I had to settle for Julia Child's Cream of Leek and Potato soup with one major modification where I used scallions and a white onion to replace the leeks. I'm not a big fan of leeks, sadly. A very simple soup, you'll be surprised that the only flavoring was salt and pepper and yet the flavor has a subtle complexity. Vegan sour cream (you'll understand why I used the vegan variety in the next paragraph) was added to finish the soup and we were on our way to a good start.

Copyright 2011 LtDan'sKitchen blogs
The main course had to serve a dual purpose of serving guests who are meat eaters and a guest who was both vegetarian and lactose intolerant. Browsing through Lidia's recipe collection, I opted for the Tagliatelle with Wild Mushroom Sauce for several reasons. First, the base for the sauce includes olive oil, butter and white wine. The butter was easy to replace with vegan butter sticks and the white wine with vegetable broth since one of the guests is also pregnant. Wild mushrooms are available frozen in my grocery store so that made my life a lot easier. The pasta itself was tagliatelle which I still had extra from the dinner last Sunday so that also saved me some time. To dress the pasta, cheese was needed and once again, rice cheese saved the day. I held off on the pecorino romano that was required and served it alongside the pasta dish for those who didn't have any lactose problems. 

Copyright 2011 LtDan'sKitchen blogs
For the meat lovers, I went for Lidia's Chicken with Olives and Pine Nuts and I have to say, this dish is very very yummy even I was surprised. The other unusual thing with this dish is how it was prepared.  I have never cooked chicken this way but it was quite effective and makes this dish a one pot dish which is an added bonus. Just be patient with it and it you'll be rewarded with an excellent dish that took only about 10 minutes to prepare and the rest of the time was spent leaving it alone while it cooked gently on the stove.

We finished the dinner with three versions of Sophia Loren's tiramisu. One was the regular version, the other was made with Tofutti - better than cream cheese vegan cream cheese and the last one that was alcohol and caffeine free. It was indeed a good way to end a weeknight dinner while looking forward to the weekend coming up ahead. Everyone was pretty tired and ready for bed after dinner so we skipped the after-dinner coffee or tea option. While we started with Chardonnay for the first course and switched to Pinot Noir for the main course, we decided to finish off the open bottle of red before we called it a night.  Thank you Lidia, Sophia and Julia for the recipes. It was muy delicioso!

Sunday, June 5, 2011

Antipasti - Rice Balls

Copyright 2011 LtDan'sKitchen blogs
This was created as a result of trying to salvage extra Bolognese sauce with ingredients that were on hand in the fridge and my cupboard. I think this is one of those really simple dish that presents as something very elaborate to make. It was actually very easy to make and the end result was surprisingly very good. Served as an antipasto, this is definitely something you serve when warm. I served it plain but a good marinara sauce will probably be a good condiment for this delicious morsel.

Based on Lidia's recipe, I followed everything to a tee except for the Bolognese sauce ( I had to add the peas though) as I already have one on hand. I do hope you give it a try. It is very very good albeit a bit messy to make.

Tagliatelle Bolognese

Copyright 2011 LtDan'sKitchen blogs
Tagliatelle bolognese is a dish I have made only twice. Once when I was in Atlanta and the second was today. It is a favorite of my friend from Argentina, Ines, who now resides in Montreal. For a pasta dish, it is a fairly involved process so I make it only for special occasions. I also took it a step further and made fresh pasta instead of buying dry tagliatelle which just really enhances the flavor of the dish. I was happy to realize that Lidia actually has a recipe for fresh tagliatelle so I used her recipe and it came out perfectly. A lot of work, but totally worth it. 

The main recipe for the bolognese sauce is from Tyler Florence. I have to admit, he seems such a nice guy on TV but I've made a couple of his recipes and they always came out flat. More often than not, his recipes take a lot of work and the flavors are usually just okay. This is an exception to the list of recipes that he authored and one that is fairly good. The trick to making this sauce is to have a lot of time to prepare it. It is better if you can do it the day before you need to serve it as the flavors have the chance to blend and develop. You make way more sauce than you need for the amount of pasta called for in the recipe but you can eat the sauce with a crusty bread and you're set.  

*Tagliatelle Bolognese - Adapted

2 oz dried porcini mushrooms
1/4 lb pancetta or slab bacon, finely chopped
1 medium onion, finely chopped
2 celery stalks, finely chopped
2 carrots, finely chopped
5 garlic cloves, minced
2 tbsp extra-virgin olive oil, plus more for drizzling
2 bay leaves
2 sprigs rosemary 
1 1/2 lb ground pork
1 1/2 lb ground beef 
2 cups condensed milk
1 (28-oz) can crushed tomatoes
2 cups dry red wine (I used Merlot)
Kosher salt and freshly ground black pepper
1 lb fresh tagiatelle pasta
Freshly grated Parmigiano-Reggiano, for serving
1 handful fresh basil leaves
Fresh ricotta cheese

1. Reconstitute the mushrooms in 1 cup hot water for 20 minutes until  
    tender.

2. Puree the mushrooms (including the liquid), pancetta, onion, celery
   stalks, carrots, garlic, together in a blender or food processor.

3. In a heavy-bottomed pot add olive oil, bay leaves, the herbs and cook
    gently until fragrant. Add the vegetable puree and continue to cook
    for a further 5 to 10 minutes.

4. Raise the heat a bit and add the ground pork and beef; brown until
    the meat is no longer pink, breaking up the clumps with a wooden
    spoon. Add the milk and simmer until the liquid is evaporated. 

5. Carefully pour in the tomatoes, and wine and season with salt and
    pepper. Bring the sauce to a boil, then lower the heat and cover.
    Slowly simmer for 1 1/2 to 2 hours, stirring now and then, until the
    sauce is very thick. Taste again for salt and pepper.

6. When ready to serve, bring a large pot of salted water to a boil, add
    the pasta and cook for 8 to 10 minutes or until "al dente". Drain the
    pasta well and toss with the Bolognese sauce. If using fresh pasta,
    it takes only a few minutes to reach the al dente stage so do keep an
    eye on it.

7. Serve with a good scoop of fresh ricotta cheese and garnish with
    some shredded basil, grated Parmigiano and a drizzle of olive oil.