Recipes

Showing posts with label Main Course. Show all posts

Saturday, July 25, 2015

Callos (non-tripe version)

Copyright 2015 LtDan'sKitchen blogs
I have been cooking Callos regularly ever since I managed to successfully cook the dish using different recipes, usually of the original Madrid variety. However, it was a trip to our local farmer's market where I was able to taste a local version of Callos and I was pleasantly surprised at how good it tasted. However, I should not really doubt that it would taste good as the same stall was selling what is now my favorite fresh ubod lumpia. I have become the Callos snob as of late thinking that Callos should be given its proper due by preparing it as authentically or as close as you can get to the Madrid version. However, I have to say that adding a few ingredients not typical of the dish do have its merit. The green olives cuts into the fattiness of the dish and gives it a good balance. The chickpeas on the other hand brings an added crunch to an otherwise mushy dish. The use of "terno" instead of tripe also lends quite a distinct taste to the dish although a single bite will assure you that what you are enjoying is indeed Callos.

Callos

10 lbs "terno" (ox tail, cheek, and legs), sliced into large portions
3 large onions, diced
8-10 bay leaves
1 whole clove garlic, roughly diced
3 large carrots, diced
1 32-oz canned diced tomatoes
1/2 cup tomato paste
12 cups beef broth
1/2 tsp dried oregano
1 tbsp Spanish paprika
1 cup canned pimientos, sliced
2 cups green olives
1 cup chickpeas
8-10 oz canned Spanish chorizo (about 1 cup), sliced
salt and pepper
*4 tbsp olive oil (optional)

1. In a large pot, boil the meat with enough water, half the onions and 4
    bay leaves. Season with salt and pepper. Let it boil for about an hour 
    over medium heat. Turn off the heat and allow to cool. 

2. Pour off the liquid and wash the meat pieces and trim off any hard 
    pieces. 

3. In another large pot, heat the olive oil if using, over medium high 
    heat. Saute the remaining onions, bay leaves and garlic until 
    softened. Season with salt and pepper. Add the carrots and cook for
    another 3 minutes. 

4. Return the meat pieces into the pot and pour in the beef broth. Bring
    to a boil and once boiling, cover the pot and lower the heat to 
    medium low and allow to simmer for at least two hours. Add water if 
    necessary to make sure the meat is submerged while simmering. 

5. Add the can of tomatoes and simmer for an additional hour or until 
    the meat is very tender. Turn off the heat and allow to cool. Make
    sure that the meat is tender enough that the bones come off easily.

6. Pick off the large bones and slice the meat into 1-inch dice. Add the
    paprika, oregano, pimiento, chickpeas, tomato paste, and olives. 
    Bring to a boil and allow to simmer at medium low heat for 30 
    minutes. Add more water if the sauce is too thick. 

7. Check for seasoning and add the chorizo. Simmer for another 30 
    minutes. Let it rest for about 15 minutes to allow the flavors to 
    meld. Serve with steamed white rice. 

* The canned Spanish chorizo is stored in lard. If you want, you can use the lard instead of the olive oil to suate. It adds an extra flavor to the dish. 

Pork Barbecue

Copyright 2015 LtDan'sKitchen blogs
A simple summer staple and I cannot believe this is not in my blog yet. My Dad has stopped eating pork but he recently started eating them again so this was a welcome relief for me since I can only do so much with fish. Our pork barbecue is on the sweet side and that is how my family prepared it as far back as I can remember. I used to make this for the yearly picnic when I was working as a postdoc at Emory. Everyone loved them since the flavor is probably quite different from the usual barbecue flavor. Anyway, this is perfect even in the middle of summer paired with ice-cold soda. 

Pork Barbecue

2 lbs pork belly
1/4 cup soy sauce
1/4 cup lemon juice
4 garlic cloves, crushed
3 tbsp tomato ketchup
2 tbsp brown sugar
2 tbsp olive oil
1 tbsp sea salt 
1/2 tsp ground black pepper

1. Combine the soy sauce, lemon juice, garlic, ketchup, brown sugar,
    and olive oil in a large bowl.  

2. Add the pork and season with salt and pepper. Let stand for at least
    30 minutes in the fridge. You can do this overnight and the flavors 
    just seep into the meat. 

3. Prepare the coals and make sure it is not too hot. Grill the belly until
    it turns a beautiful brown color with a bit of charring. 

4. You can serve them whole or you can cut them into smaller pieces. 
    A good condiment is a combination of 3 tbsp lemon juice, 1 tbsp soy 
    sauce, finely minced garlic clove and seasoned with salt and pepper. 

Saturday, February 14, 2015

Rustic Roasted Chicken Galantine

Copyright 2015 LtDan'sKitchen blogs
Chicken Galantine is a French dish that is prepared to impress. It is laborious, both in the preparation and in the cooking process. The ingredients are varied but there seems to be a common thread among the different recipes I read to prepare my own rustic version of this dish. The filling is usually prepared using either ground veal or beef in combination with ground pork. The nut of choice are pistachio nuts with either apricot or raisins to add some nuttiness and sweetness respectively, to the flavor. Traditionally ground into a forcemeat, I am going to prepare my filling more like a meatloaf preserving the texture of the various ingredients intact for maximum impact. Truth be told, I'm not a big fan of cold cuts and the galantine is prepared to resemble one. Another big change is how I plan to cook my galantine. The original recipe calls for the galantine to be wrapped in cheesecloth and poached in a broth. I am baking my galantine and serving it warm.

Rustic Roasted Chicken Galantine

3-4 shallots, finely diced
2 tbsp unsalted butter
50g pistachios, shelled and roughly diced
1 whole chicken, about 2 lbs
1/2 lb ground beef
1/2 lb ground pork
1/2 lb bacon strips
5 tbsp heavy cream
1 egg, beaten
1/3 cup golden raisins
4 tbsp white wine
1/2 tbsp dried thyme
salt and pepper
olive oil

1. Debone the chicken leaving the leg and wing bones intact. Set aside. 
    Preheat the oven to 350°F.

2. In a small pan over medium heat, melt the butter and saute the shallots 
    until softened. Let cool.

3. In a large bowl, combine the rest of the ingredients except the bacon. Add
    the shallots and mix with your hands. Season with salt and pepper.

4. Lay flat the deboned chicken, skin side down and season with salt and 
    pepper. Layer the bacon strips until it covers the inside of the chicken. 

5. Fill with the meat filling and gather the edges securing with a toothpick or 
    by sewing. Truss the chicken with a butcher's twine and place in the 
    center of a baking pan lined with aluminum foil seam side down. Baste 
    with enough olive oil to help brown the skin.

6. Bake for 1 1/2 hour or until a meat thermometer reads 160°F. Let it rest
    for 15 minutes covered with foil before slicing.    
    

Saturday, January 17, 2015

Penelope Casas' Callos

Copyright 2015 LtDan'sKitchen blogs
Callos, a name which to me evokes the Spanish colonization of the Philippines for over 300 years. Despite the hardships the Filipino had to endure during this period, there were influences in our culture that may or may not be a welcome choice to the Filipinos. One such influence is in our food. The original Callos may have hailed from Madrid, Spain but Callos is a staple in most celebrations here in the Philippines. I have to admit that our family came across this dish kind of late but I have been trying on different versions of this dish recently based on recipes considered as original to Spain and not the adapted local version. Why the original? Simple. The original Callos is quite rustic and meager in terms of preparation and the amount of ingredients while the local version of the dish have morphed into different varieties with the addition of white beans, chick peas and even carrots. I just want a simple dish with nothing else to distract me from its pure and clean flavor. 

Copyright 2015 LtDan'sKitchen blogs
This new recipe is from Penelope Casas and uses beef tripe as the base. Pork legs are added for both texture and flavor. Morcilla or blood sausage is typically added in most recipes I've read but this particular recipe called for Spanish chorizo. I used an authentic Spanish chorizo imported from Spain and another one that is locally made (both canned). I have to admit, both are fairly similar in taste and in terms of prize, both are also quite expensive. Still, it was worth the expense. If cholesterol is not an issue for you, use the lard in the can as well. It adds to the flavor of the dish.

Penelope Casas' Callos

6-8 lbs beef tripe
4 lbs pork legs, sliced into 1-inch medallions
6-8 bay leaves
6 large Spanish onions, diced
1 bulb garlic, crushed and diced
2 tsp dried oregano
14-oz canned diced tomatoes
1 tbsp peppercorns, freshly ground
1/4 tsp ground nutmeg
1 tsp thyme
2 cups white wine
12 cups beef broth
1 lb Spanish sausages (Chorizo)
1/2 lb cured ham, diced
6 tbsp Spanish paprika
6 tbsp flour
1 tsp red chili flakes
6 tbsp olive oil
salt, to taste

1. In a large pot, fill with enough cold water to cover the tripe and the pig's 
    feet. Bring to a boil and immediately drain the liquid.

2. Rinse the tripe with cold water and slice into 2-inch squares. Clean the 
    pig's feet of any debris and set aside with the tripe. 

3. In the same large pot, add the tripe and pigs feet with half the onions, 
    garlic, bay leaves, oregano, diced tomatoes, white wine, beef broth, 
    nutmeg, thyme, ground peppercorns and season with a bit of salt. Bring 
    to a boil and simmer covered for 3 hours over low heat. Check 
    occasionally and add more water if needed. Stir to prevent the meat 
    from sticking to the pan. 

4. In a large skillet, heat the oil over medium high heat and saute the 
    remaining onions until softened. Season with salt. Add the chorizo and 
    cook until heated through. You may add the lard from the can if desired. 
    Stir in the flour and paprika and cook for a minute. Loosen with about 
    2 cups of water and add to the large pot. Stir well to prevent any lumps.

5. Add the red chili flakes and continue to simmer for another 1-2 hours or 
    until the tripe is very tender. Stir occasionally to prevent the meat from 
    sticking to the bottom of the pan. When ready to serve, fish out the pork 
    pieces and remove the bones. Slice the pork skin and meat into smaller 
    pieces and return to the pot. Check for flavor and adjust accordingly 
    with salt. 

*The New York Times: Cooking section
    

Monday, August 25, 2014

Black Rice Paella

Copyright 2014 LtDan'sKitchen blogs
Black Rice or Arros Negre is a Spanish dish similar to seafood paella but only in terms of preparation. The black color is obtained by using squid ink or cuttlefish ink. Mistakenly referred to as Black Paella, it is technically not a paella dish. Oftentimes, shrimps and crabs are added to the dish which is cooked in a seafood broth. 

For my version of Black Rice, I actually leaned more towards the paella dish and literally used organic black rice that I bought in the local market of Miagao. In Bacolod where I grew up, organic black rice is very expensive because the residents of Bacolod city are willing to pay for a much higher price especially since it is organic. In Miagao where rice is basically white rice, nobody gave a damn that there was this underpriced organic product and I for one am only too happy to take advantage of this treat. 

To prepare this dish, you need a lot of patience and suppress the urge to open the large wok during the last part of the preparation. This is to ensure that the rice is cooked perfectly while the meat stays moist and flavorful. I hope you give this dish a try. 

Black Rice Paella

6 cups organic black rice
2 lbs chicken, cut into eights
1 lb assorted sausages
48 pcs quail eggs, hard boiled and peeled
2 large red bell peppers, julienned
1 cup white onions, diced
32 oz canned diced tomatoes
4 garlic cloves, minced
6 cups chicken broth
1/2 cup white wine
2 tbsp Dijon mustard
2 bay leaves
1 tsp smoked paprika
1 tsp dried oregano leaves
1/2 tsp thyme
1/4 tsp ground coriander
4 tbsp olive oil
1 10-oz frozen peas
1 cup black olives
lemon wedges
parsley leaves

1. Wash the rice in water and drain. Set aside.

2. In a large wok, heat the olive oil over medium high heat. Cook the 
    sausages until browned. set aside. 

3. In the same wok, saute the garlic, onions and bay leaf. Season with salt 
    and pepper and cook until softened. 

4. Add the chicken pieces and season with salt and pepper. Brown the chicken
    on both sides. Add the paprika, oregano, thyme, and coriander. 

5. Deglaze the pan with the white wine and bring to a boil. Once boiling, add 
    the broth and season with the mustard. Return to a boil and cook for 10 
    minutes covered. 

6. Add the rice and pour in the diced tomatoes. Check for seasoning and 
    adjust accordingly. Lower the heat to medium low and cook uncovered 
    until almost all the liquid has evaporated. 

7. Stir in the frozen peas, black olives and red bell peppers. Slice the sausages 
    into wedges and arrange on top of the rice with the quail eggs. 

8. Lower the heat to its lowest setting and cook covered until the rice has 
    cooked perfectly. Garnish with the chopped parsley leaves and the lemon 
    wedges. Drizzle with more olive oil if desired.   
  

Fish Eyes Soup

Copyright 2014 LtDan'sKitchen blogs
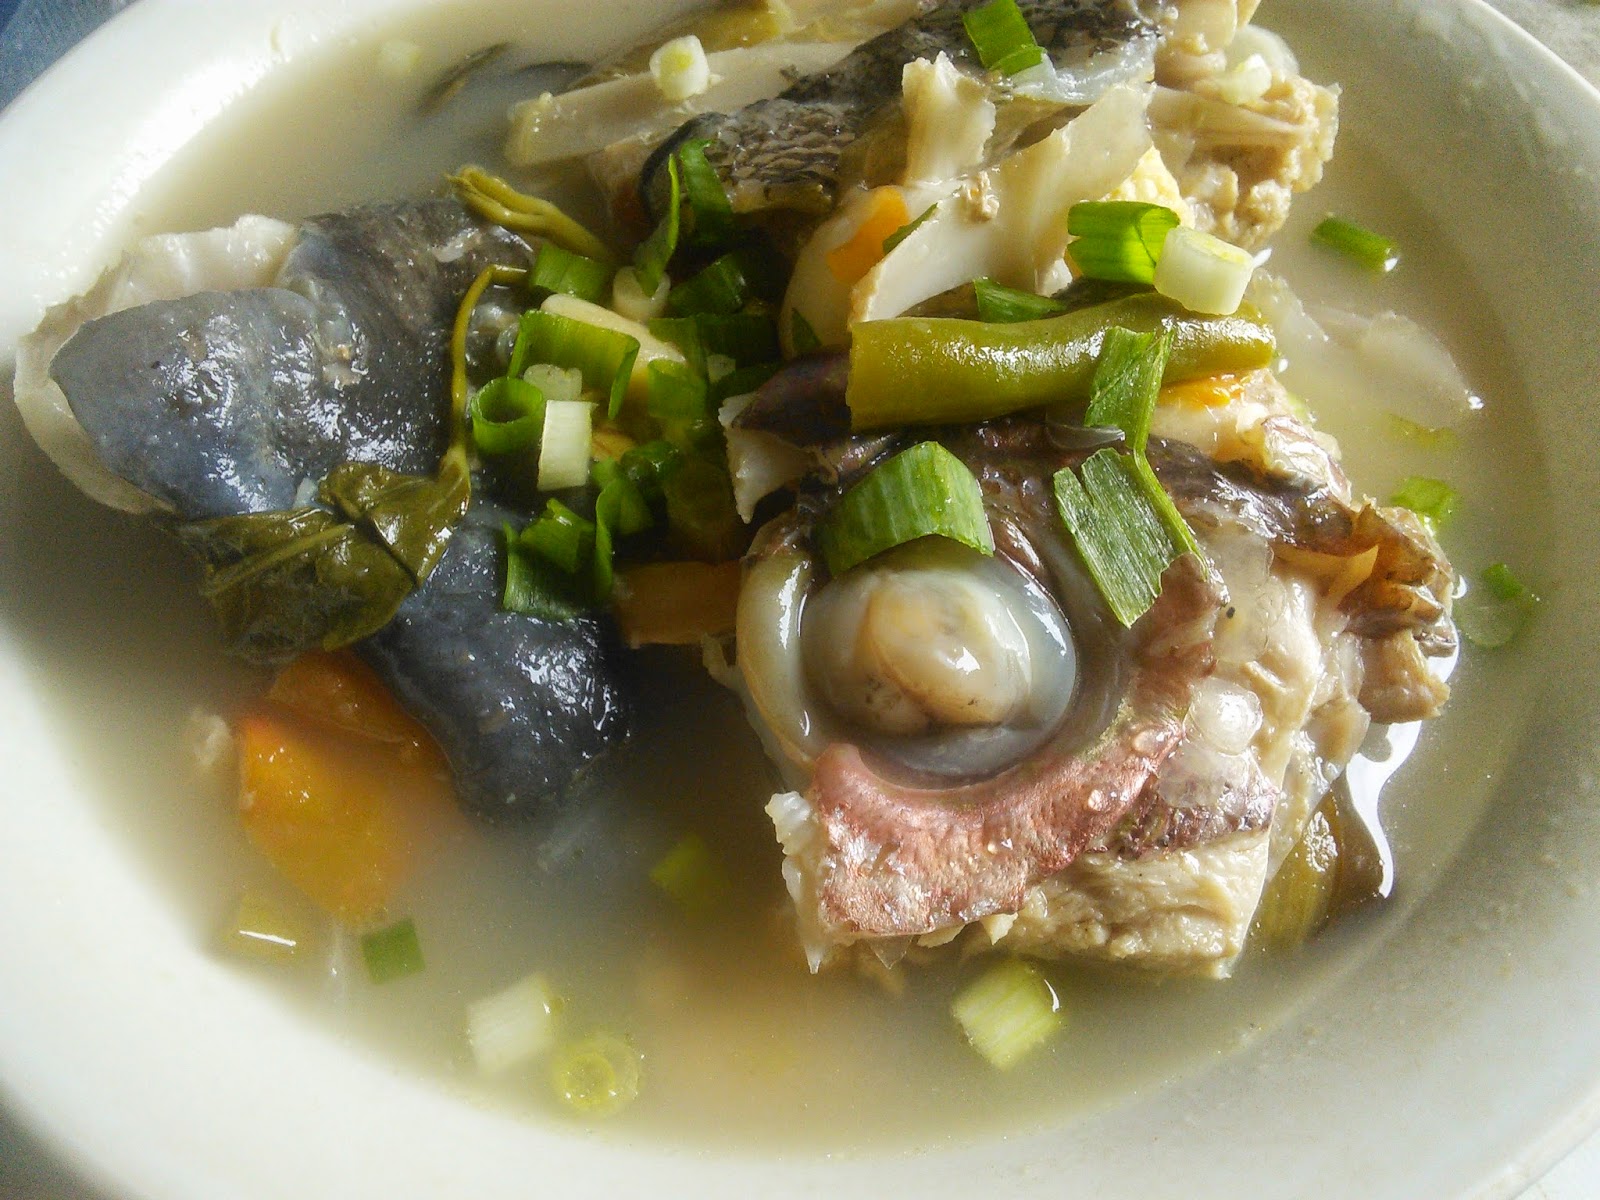
The inspiration for this rather macabre dish is a very famous restaurant dish in Davao. Marina Tuna offers a variety of dishes using tuna and one of them is the Tuna Eyes Soup. If fish eyes are not to your palate, just look away and savor the broth that comes from this soup. It is simply divine. You will not want anything to slurp on during the cold winter months or when you are feeling a bit run down from too much work. This soup is just amazing. 

Anyway, looking at the picture of the actual dish, I had to try and imagine what it tasted like when I feasted on it a few months ago during my trip to Davao. Marina Tuna was the first restaurant we went to after we checked in at the hotel and it was a good sign of what lay ahead of our 4 day trip. Granted you may not want to prepare this dish but if you are brave enough, I will write down the basics for you. 

Fish Eyes Soup

2 lbs head of large marine fish, cleaned and cut into small pieces
3 garlic cloves, minced
1 large white onion, diced
4 tomatoes, quartered
5 stalks of green onions, sliced
2 Japanese eggplant, cut in 2-inch lengths and halved
3 small radishes, peeled and sliced into thin medallions
1 stalk lemon grass
1 tamarind bullion
4 pieces batwan (optional)
1 cup green beans, sliced into 1-inch lengths
8 cups water
salt and pepper
2 tbsp fish sauce
1 cup water spinach tops (kangkong)

1. In a large pot, add the garlic, white onion, lemon grass, tamarind bullion,
    batwan if using and water. Season with a tablespoon of salt and some 
    pepper. Bring to a boil over medium high heat.

3. Once boiling, add the tomatoes, eggplant and radishes. Lower the heat to 
    medium low and cover. Simmer for about 5 minutes. 

4. Add the fish. Season with the fish sauce and simmer covered for 20 
    minutes or until the eggplant is tender but not mushy. 

5. Add the green beans and cook until it turns bright green. Check for flavor 
    and adjust accordingly. 

6. Prior to serving, add the water spinach and cook until just wilted. Garnish 
    with the green onions ans serve while hot. 
      

Feijoada

Copyright 2014 LtDan'sKitchen blogs
Brazil's "National Dish" is a gastronimic delight in its simplicity. The inspiration came from being part of the planning committee to look for caterers of our school's alumni event. Our theme is Brazil's Carnaval so we wanted every bit of the the event to evoke the spirit of Brazil. In terms of food, we really cannot expect our local caterers here to prepare authentic Brazilian dishes but we can surely come close by doing a bit of research. That research came up with this very simple dish which actually evokes a very similar dish back home. Not very surprising since a lot of Filipino dishes have a strong Spanish influence to them. 

To prove a point, my hometown boasts the KBL which stands for Kadios, Baboy and Langka or in English, Pigeon Pea, Pork and Young Jackfruit. It is a stew that is best cooked over charcoal and is served on Sunday lunches right after the family has gone to mass. This was how we usually enjoyed this dish growing up in my hometown. The stew makes use of cheaper cuts of pork so a good slow cooking over burning coals is ideal. Similar to KBL, I used ham hocks for my Feijoada which require a bit of cooking time and to balance the flavor, I added smoked Polish sausages. Originally, black beans would have been ideal but I ended up getting a variety of black beans that cooked a bit lighter in terms of color although the flavor was quite delectable nonetheless. 

The preparations are very similar with the exception of the addition of the young jackfruit slices but this very simple dish really packs quite a bit of WOW in the flavor department. I would eat this dish everyday if it were not my doctor will have a fit because of my gout.

Feijoada

4 lbs ham hocks - sliced into 2-inch thick rounds
1 1/2 lb smoked Polish sausages, sliced in thirds
2 large onions, diced
6-8 garlic cloves, minced
2 lbs black beans
1/2 cup tomato paste
4 bay leaves
salt and pepper
4 tbsp coconut oil
8-12 cups beef broth

1. In a large bowl, soak the beans in water for 8 hours to overnight. Drain 
    and set aside. 

2. In a large pot, heat the coconut oil over medium high heat. Saute the 
    garlic and onions and season with salt and pepper. Cook until softened. 

3. Add the bay leaves and saute for a minute. Pour the broth and add the
    ham hocks one at a time. Add more water to fully cover the pork pieces. 

4. Bring to a boil and cover. Reduce the heat to medium low and simmer 
    covered for another 30 minutes. 

5. Add the beans and continue to simmer until the ham hocks are almost 
    falling apart and the beans are soft and tender. This will take about 2 
    hours. Add more water if necessary. 

6. Once the meat and the beans are tender, add the smoked sausages and 
    the tomato paste. Continue to simmer uncovered for another 15 minutes. 

7. Check for seasoning and adjust accordingly. Serve while hot. 
    

Moqueca

Copyright 2014 LtDan'sKitchen blogs
Moqueca is a saltwater fish stew native to Brazil. Depending on the location, it can be cooked in coconut cream with tomatoes and some key ingredients like cilantro and palm oil. Traditionally cooked in a terra cotta pot, shrimps can be added in combination with boneless fillet of fish when preparing this hearty stew. 

I do have access to a terra cotta pot in my hometown but I made use of modern metallic pans to cook this dish. We used to cook on them but it has been such a long time since I've used one and I'm not sure how great a brand new pot will hold when you use it to cook a stew dish. In terms of the kind of fish you can use, it rather depends on what is available in your market that day. For me, the main star which is the fish can be any fillet of white fish that has some sturdiness to it. Cream dory or maybe even tilapia will be perfect for this type of preparation. Both are freshwater fish but the texture is perfect for this type of preparation and they are readily available in the grocery stores. Tuna or salmon would have been perfect for this stew. There are numerous authentic recipes of the dish but I used and modified the recipe from this blog.

Moqueca - Adapted*

2 lbs cream dory fillets, cit into 2 inch lengths
3 garlic cloves, minced
1 small white onion, diced
1/4 cup calmondin juice, or lime 
5 stalks green onions, chopped finely
1 yellow bell pepper, diced
1 red bell pepper, diced
1/4 cup cilantro, chopped coarsely
4 large tomatoes, diced
1 tsp smoked paprika
1/4 tsp red chili flakes
3 cup fresh coconut cream
3 tbsp coconut oil
salt and pepper

1. Mariante the fish fillet in the calmondin juice and season with salt and 
    pepper. Set aside. 

2.  In a large pot, heat the coconut oil over medium high heat. Saute the 
     garlic, white onions, red bell pepper, yellow bell pepper, and tomatoes 
     until softened. Season with salt and pepper. 

3. Add the chili flakes and cook for another minute. Mix in the paprika and 
    continue to saute for another minute. 

4. Arrange the fish in one layer over the softened saute mix and pour in the
    marinade. Ladle the coconut cream and continue to cook until it start to 
    boil. Lower the heat to low and simmer covered for about 10 minutes. 

5. Add the green onions and about half of the cilantro and continue to 
    simmer for another 5 minutes. Check for seasoning and adjust to taste. 

6.  To serve, garnish with the rest of the cilantro or more green onions and 
     pair with steamed white rice. 

*Moqueca: Simply Recipes

Friday, July 11, 2014

Chicken Curry with Basil Leaves

Copyright 2014 LtDan'sKitchen blogs
Chicken curry is a very common dish in the Philippines during fiestas or special occasions. Well, in my family anyway.This curry dish although very simple is quite unique in the sense that this is the first time that I am cooking a curry dish from scratch. I used to buy a packet of Madras curry powder mix back in the US while here in the Philippines, I use the curry mix sold in the market that is a bit sweeter in terms of taste once cooked in coconut cream. I am aware that for Indians, they actually prepare their own curry mix based on the region that they come from. I made the mistake of asking which brand of curry powder mix they bought for a dish that they had cooked that I loved. Never will I ask again.

Anyway, this is a very simple curry dish but make sure that you have the best powdered spice for this dish to actually work. The result was a creamy dish although the sauce is still a bit loose and not too thick. The basil leaves are the perfect aromatic foil to this otherwise rich dish and gives it some sense of balance in terms of flavor and aroma. The recipe is an adaptation from the blog, Simply Recipes.   

Chicken Curry with Basil Leaves - Adapted*

2 lbs chicken, cut into smaller pieces
1 onion, diced
5 garlic cloves, minced
1 tbsp ginger, peeled and sliced
1 finger chili
2 tbsp margarine + 2 tbsp coconut oil
2 cups fresh coconut cream
20 basil leaves
salt and pepper
 
Curry Mix:
1/2 tsp celery powder
1/2 tsp ground cumin seeds
1/2 tsp cinnamon 
1/4 tsp cardamom
1/8 tsp Cayenne pepper
1/2 tsp turmeric powder

1. In a deep pan, heat the margarine with the oil over medium high heat.
    Saute the garlic, ginger, and onions until softened. Season with salt and
    pepper. 

2. Add the chicken pieces and cook until browned. Season with salt and 
    pepper. 

3. Add the coconut cream and bring to a boil. Once boiling, lower the heat
    to medium low and simmer covered for 10 minutes. 

4. Add the curry mix and the finger chili. Simmer covered for another 15 to
    20 minutes or until the chicken pieces are thoroughly cooked.  Add a 
    small amount of hot water if it starts to thicken a bit too quickly.

5. Check for seasoning and adjust accordingly. Mix in the basil leaves and 
    stir until just wilted. Serve immediately with steamed white rice. 

*Basil Chicken in Coconut Curry Sauce, Simply Recipes blog. 
 

Corkscrew Pasta with Shrimps in Creamy Pesto Sauce

Copyright 2014 LtDan'sKitchen blogs
Shrimps plus pesto equals magic! Really! This is what I have been dreaming of for the last few weeks. I was saving a good batch of shrimps for a friend who loves them but I needed to practice on a recipe that he specifically asked for so that I can do it perfectly this time. However, with the bad weather, good shrimps are hard to find. It was probably my luck when my brother who came for a visit brought with him a bag of fresh shrimps. At that time, I knew it was time to make pesto. It wasn't the recipe I was planning to make but I had a big bunch of organic basil leaves in my fridge so it had to be a pesto dish.

The recipe is a combination of Emeril's take on a pasta dish with shrimps and a creamy pesto sauce. I had to change the recipe a bit as I wanted a much lighter dressing on my pasta. Overall, the longest preparation time is when you cook the pasta. The rest of the dish was quite easy to put together with tremendous results.

Corkscrew Pasta with Shrimps in Creamy Pesto Sauce - Adapted*

Seasoning Mix:
1 tsp salt
1/4 tsp black pepper
1/8 tsp Cayenne pepper
1/4 tsp Spanish paprika
1/8 tsp dried oregano
1/8 tsp dried thyme

2 lbs fresh shrimps, peeled and deveined
1 lb corkscrew pasta
1/2 cup pesto
1 cup heavy cream
1/3 cup Parmesan cheese
1/4 unsalted butter
1/4 cup olive oil
4 garlic cloves, minced
1 small onion, diced
2 tbsp chopped parsley

1. Cook the pasta as per packet instructions. Cook until al dente. Set aside. 
    Save some of the pasta water.

2. Season the shrimps with the seasoning mix and allow to sit for 5 minutes. 

3. In a large pan, melt the butter in the olive oil over medium high heat. Add
    the shrimps and cook until it turns salmon pink. Remove from the pan and 
    set aside. 

4. Saute the onion and season with salt and pepper. Cook until softened. Add
    the garlic and continue to saute until the garlic turns golden brown. 

5. Add the cream and the pesto. Stir quickly and cook until it simmers. Add
    the cooked pasta and stir until the sauce has coated the pasta. Mix in the
    cooked shrimps. If the pasta is a bit dry, loosen with the pasta water. 

6. Turn off the heat and sprinkle in the cheese and the parsley. Serve 
    immediately.

 *Lagasse, E.; Shrimp with Linguini in a Creamy Pesto Sauce.

Friday, June 27, 2014

Adobo - Iloilo Version

Copyright 2014 LtDan'sKitchen blogs
This is yet another version of the national dish of the country. I did not know there was actually a second version to the dish in the western visayan region. I always thought that the one version I cook is representative of the region but I was proven wrong. Anyway, the main difference between the two dishes is really not that significant although this minor change will render the dish a bit different in terms of how it looks and very slightly on how it tastes. Overall, the dish is still very delicious. 

To make the switch, all you need really is annatto powder. Traditionally, you extract the annatto color from the actual seeds which you can still do. However, with the wonders of large supermarkets, you can now buy annatto powder and they work the same way without all the mess. 

Adobo - Iloilo Version

1 lb chicken pieces (about 8 pieces)
4-6 garlic cloves, crushed
1 onion, sliced
3 dried bay leaves
1 tbsp annatto powder
1/4 cup brown sugar
1 1/2 cup white vinegar
3 tbsp oil
salt and pepper

1. Heat the oil in a deep pot over medium high heat. Once hot, saute the
    onions with the garlic until softened. Season with salt and pepper. Add
    the bay leaves. 

2. Add the chicken to the pan in one layer and season with salt and pepper.
    Brown on both sides. Once browned, add the vinegar. 

3. Bring to a boil and lower the heat to medium low. Simmer covered for 
    about 20 minutes. 

4. Add the annatto powder and brown sugar and mix well into the vinegar 
    sauce. Bring to a simmer and cook covered for another 15 minutes. If it 
    starts to dry up, add a bit of water. 

5. Check for seasoning and adjust accordingly. There should be a good 
    balance between sweet, sour and salty. If you prefer it a bit sweeter, add
    more sugar. If you want it a bit drier, just continue to simmer uncovered 
    until you reach the desired consistency. Serve with steamed rice.   

Pan-seared Tuna

Copyright 2014 LtDan'sKitchen blogs
What I'm presenting is a real treat. I'm one of those people who love sashimi which is basically raw fish dipped in soy sauce with a bit of wasabi. Nothing is more simple and yet nourishing than this exquisite Japanese dish.The inspiration to prepare this dish came to me when I went to the market one morning and they laid out freshly cut tuna. My mind suddenly thought of sashimi and tuna rolls but try as I might, there is a shortage of Japanese rice at the moment in my hometown. So with a heavy heart, I had no choice but to freeze the most wonderful and freshly cut slabs of tuna meat until I can get hold of the things I will need to prepare an authentic Japanese meal.

Two weeks have passed and there is still no Japanese rice to be bought in the market and grocery stores so I have decided to cook the tuna a bit differently. I'm glad I sliced the tuna slab into large portions that I can actually prepare it pan-seared with the middle part still gloriously reddish pink. The question is, how do I season it? Well, after some research, I came up with the prefect marinade and coating to prepare my lovely tuna. 

Pan-seared Tuna

6-8 oz sushi grade tuna steaks (at least 1-inch thick)
3 tbsp dark sesame oil
3 tbsp soy sauce
1 tbsp fresh ginger, grated
2 cloves garlic, grated
dash or two of black pepper
juice of 1/2 lemon
3 stalks spring onions, chopped finely
1/3 cup sesame seeds
2 tbsp olive oil

1. To marinade the steaks, combine in a shallow bowl the sesame oil, soy
    sauce, ginger, garlic, spring onions, lemon juice and season with the 
    black pepper. 

2. Arrange the tune steaks so that they are laid flat in the bowl and marinate
    for about 30 minutes turning them halfway. 

3. When ready to sear, heat the olive oil in a non-stick pan over medium 
    heat. Dredge the tuna steaks with the sesame seeds on the top and the 
    bottom. 

4. Sear the tuna steaks for about 1 1/2 minute on each side. Remove from 
    the pan and let cool for a minute. Slice into the desired thickness and 
    serve with a side of soy sauce and wasabi.  

Sunday, May 4, 2014

Callos MadrileƱa

Copyright 2014 LtDan'sKitchen blogs
Finally, a Callos recipe. The evolution of my love for Callos came a bit slow. This was not something I cooked regularly nor was it something my family loved. In fact, this was an alien concept to me until much later when I was living in the US. My friend, Nashiely, who is Mexican invited me over for dinner at their place when her parents came for a visit. Her Mom, an excellent cook made Callos and I was the only one who ate it. She made the real deal with tripe although her version also included the addition of chickpeas. Prior to this occassion however, there was another occasion where Callos was served although the exact details escape me somehow but when I went home for a visit, I requested that Callos be cooked. This was way back in 2004. 

Fast forward to now, I have been cooking Callos whenever my friends requested for it here in my hometown. I did make this dish once when I lived in Montana and my roommate who was also my landlord, banned the dish from being ever made again. He said that cooking the tripe stank the house. So there goes my Callos fix. At that time, I followed the recipe of MarketMan as written in his blog but there were a few changes I made due to the unavailability of certain ingredients so I made do with what was available. Here in Bacolod, I have learned my lesson and I now know that to make this dish, it requires planning because tripe has to be pre-ordered and so are the other beef portions that make up this wonderful dish. The good thing is that they are fairly reasonably priced.

If you ever decide that you want to prepare this dish, have the whole day set for nothing else but to making Callos. Actually, it is best if you start at night and then you serve it for lunch or dinner the next day. To make sure that the steps are described accurately, I will break down the recipe in three steps.

By the way, I am adapting the name of the dish as MarketMan named his version due to the fact that I did follow a recipe that is indeed more Spanish in origin rather than Filipino. If you notice, there are no chickpeas or potatoes in the recipe which are used as extenders. My version is indeed a meat lovers delight and a nightmare for persons with uric acid problems.   

Callos - Adapted from MarketManila*

Tripe

4 lbs ox tripe
sea salt
2 onions, diced
4 garlic cloves, crushed
1/2 cup white vinegar
2 bay leaves
salt and pepper

1. Clean the tripe by rubbing with the sea salt. Scrape off any residual grit 
    and rinse off with water.  Slice into manageable sizes so that they all 
    fit your stock pot.

2. In a large pot, layer the tripe and add the bay leaves, onions, garlic, white 
    vinegar and season with salt and pepper. Add enough water to cover the 
    tripe and bring to a boil over medium high heat. Once boiling, lower the 
    heat to medium low and simmer covered for about 30 minutes. 

3. Turn off the heat and leave the tripe in the stock pot until cooled. 

4. Once cooled, drain the tripe and slice into rectangular pieces or depending 
    on how big or small the dish requires them to be. Rinse with more water 
    and check if it smells clean. 

To prepare the tripe for cooking, here is the next step:

Copyright 2014 LtDan'sKitchen blogs
In a large pot, arrange the tripe and add 1 cup of white wine and 2 bay leaves. Season with salt and pepper and add enough water to cover the tripe. Bring to a boil over medium high heat and once boiling, lower the heat to medium low and simmer covered until the tripe is fork tender. This will take a couple of hours so check regularly and make sure to add enough water every now and then. If using a pressure cooker, it takes about 40 minutes of cooking once it starts to whistle. Turn off the heat and allow to cool. Drain and rinse with water. Set aside.

Ox Tail, Legs, and Face 

8 lbs of ox tail, legs and face
2 bay leaves
2 onions, diced
6 garlic cloves, crushed
salt and pepper

Copyright 2014 LtDan'sKitchen blogs
In a large pot, arrange the ox pieces and cover with enough water. Season with the bay leaves, onions, garlic and enough salt and pepper. Bring to a boil over medium high heat and once boiling, lower the heat to medium low and simmer covered for about 3-4 hours or until the meat is very tender. If using a pressure cooker, cook over medium high heat for 40 minutes when it starts to whistle. Turn off the heat and allow to cool. 

Once cooled, fish out the meat pieces and rinse any muck that has stuck to the meat and slice to the desired size. Pour the broth through a sieve and set aside. 

Callos

Pre-cooked tripe and ox meat
2 onions, diced
6-8 garlic cloves, diced
3 carrots, diced
4 bay leaves
1 32-oz canned diced tomatoes
1 200-g canned pimientos
1 1/2 to 2 lbs kielbasa (or blood sausages and Spanish chorizo if available), 
   sliced into rounds
1 1/2 cups tomato paste
8 cups beef broth
1 tbsp Spanish paprika
1 tsp diced chili
1/2 tsp dried oregano
salt and pepper
4 tbsp olive oil

1. In a large pot over medium high heat, add the olive oil. Once hot, fry the 
    sausages until slightly browned. Set aside. 

2. In the same pot, saute the onions with the bay leaves, garlic, paprika, and 
    chili. Cook until the onions have softened. Season with salt and pepper. 

3. Add the carrots and pimientos and cook until heated through. Pour in the 
    beef broth and bring to a boil. Once boiling, add the tripe, ox meat and 
    the sausages. 

4. Lower the heat to medium low and simmer covered for 30 minutes. 

5. Add the diced tomatoes and the tomato paste and check for seasoning. 
    Adjust accordingly. Continue to simmer for another 30 minutes to an hour 
    until you achieve the desired consistency. If needed, add more beef broth 
    if it starts to thicken too quickly. Add the oregano when the Callos is 
    almost ready.

6. At this point, you can serve the Callos after you check for flavor and make 
    the necessary adjustment. The stew should be thick enough to coat the 
    meat pieces but is still loose enough that that it drips when tipped. 

If not serving right away, allow to cool and store in the fridge. When ready to serve, reheat over low flame and when needed, add a little bit of beef broth to loosen the stew. Recheck for flavor and serve hot. 

*Callos ala Madrilena: MarketManila blog.
 

Tuesday, December 31, 2013

Baked Stuffed Chicken

Copyright 2013 LtDan'sKitchen blogs
The birth of this dish came about when we were trying to put together bacon, butter, cheese and chicken into one dish. A quick search on the internet came up with a stuffed chicken recipe that was both simple as well as tasty. However, given my penchant for making any recipe a bit more personal, I tweaked the recipe once again until I came up with a winning formula. By then, the butter and cheese bits were no longer included in the recipe. This was a big hit during my Christmas lunch celebration with family and friends and for the literary folks, it has a bit of 50 shades thrown in for good measure. I should really call this dish 50 Shades of Poultry but then again, I better not.

A few things to keep in mind if you plan to try this dish are: one, learn how to partially debone a chicken. By partial, I meant leaving the drumstick intact. It saves you time when baking it and two, you need to learn how to sew and tie up a chicken. No worries however, as both can be easily learned and once perfected, it will only take about 15 minutes to debone a chicken and stuff it with any filling that suits your fancy.

Baked Stuffed Chicken

2 2-lb whole chicken, deboned
1 large onion, diced
4 garlic cloves, minced
2 tbsp parsley, chopped
1 cup brown rice, cooked
1 cup bread crumbs
1/2 tsp Herbes de Provence
8 strips of bacon, diced
salt and pepper

1. In a skillet over medium high heat, brown the bacon. Once browned,
    remove to a plate and set aside. 

2. In the same skillet, saute the onions and garlic in the bacon drippings. 
    Season with salt and pepper and cook until softened. Let cool. 

3. Prepare the filling by adding the cooked rice, crisped bacon, parsley and 
    bread crumbs with the sauteed onions and garlic. Mix well. 

4. Season the inside of the chicken with salt and pepper. Stuff with half the
    filling and secure both ends of the chicken with a twine. Further secure
    the chicken with more twine to retain the shape of a whole chicken. Do 
    the same for the second bird.

5. Set both birds in a baking pan cut side down and season with more salt 
    and pepper. Drizzle enough olive oil to baste the chicken. Sprinkle the 
    Herbes de Provence and bake in a preheated oven at 375°F for about 
    an hour or until the skin is golden brown.

6. Let rest for about 5 minutes before carving.