Recipes

Saturday, December 31, 2011

White Cupcakes

Copyright 2011 LtDan'sKitchen blogs
Cupcake recipes have been requested by friends before but I'm not really a cupcake person so I referred them to the Joy of Baking website along with a few of Nigella Lawson's Fairy cake recipes. It was however a surprise to learn that my nieces and nephew actually love cupcakes so I figured, it was time to bake a couple of recipes with them. I might just be able to sway them into the dark side of baking. 

Not having a lot of cupcake recipes to try out, I figured to make do with the recipes available at the Joy of Baking blog. The choices were partially decided based on the very specific tastes of my very opinionated nephew and nieces. While browsing through the blog however, I came across a minor conundrum. What is the difference between a cupcake and a muffin? It did not take me long to find a good answer and it has nothing to do with frosting. Cupcakes are basically cakes baked in individual portions while muffins are mini breads. Anyway, to get started on this post, we practice on a simple cupcake recipe.

White Cupcakes - Adapted*

Copyright 2011 LtDan'sKitchen blogs
2 large eggs
1 3/4 cups cake flour, 
   sifted
2 tsp baking powder
1/4 tsp salt
1/2 cup unsalted butter, 
   at room temperature
1 cup granulated white 
   sugar, divided
1 tsp vanilla extract
1/2 cup buttermilk
1/8 tsp cream of tartar

1. Preheat oven to 350°
    and lightly butter or line 12 muffin cups with paper liners.

2. Separate the eggs, placing the yolks in one bowl and the whites in 
    another bowl. 

3. In a mixing bowl sift or whisk together the flour, baking powder, and salt. 
    Set aside.

4. In the bowl of your electric mixer, or with a hand mixer, beat the butter 
    until soft. Add 3/4 cup of the sugar and beat until light and fluffy. Add 
    egg yolks, one at a time, beating well after each addition. Scrape down 
    the sides of the bowl. Beat in the vanilla extract. 

5. With the mixer on low speed, alternately add the flour mixture and 
    buttermilk,in three additions, beginning and ending with the flour.

6. In a clean bowl, beat the egg whites until foamy. Add the cream of tartar 
    and continue beating until soft peaks form. Gradually add the remaining 
    1/4 cup of sugar and continue to beat until stiff peaks form. With a 
    rubber spatula gently fold a little of the whites into the batter to lighten 
    it, and then fold in the remaining whites until combined. Do not overmix.

7. Evenly fill the 12 muffin cups with the batter and bake for about 18 - 20 
    minutes or until nicely browned and a toothpick inserted into a cupcake 
    comes out clean. Remove from oven and place on a wire rack to cool 
    completely. 

8. With a knife or offset spatula, spread frosting on each cupcake. If you 
    want to pipe the frosting, use a large star or a large plain decorating tip.

Butter Frosting: 

2 cups confectioners sugar, sifted
1/2 cup unsalted butter, room temperature
1 tsp vanilla extract
2-3 tbsp milk or light cream 

In an bowl, cream the butter until smooth and well blended. Add the vanilla extract. With the mixer on low speed, gradually beat in the sugar. Scrape down the sides of the bowl. Add the milk and beat on high speed until frosting is light and fluffy. Tint the frosting with desired food color if desired. 

*White Cupcakes: Joy of Baking blog

Thursday, December 29, 2011

Red Velvet Cupcakes

Copyright 2011 LtDan'sKitchen blogs
A twist on the southern classic, the Red Velvet Cake, I'm presenting a cupcake version from the Joy of Baking blog. As a dessert to bring to a New Year's party, it is elegant in its presentation but kid-friendly enough in cupcake form.  The cupcake comes fully frosted with cream cheese frosting and a topped with bright red candy roses. It is a New Year's eve party after all so I had to make it all glam and fab. 

Red Velvet Cupcake - Adapted*

Copyright 2011 LtDan'sKitchen blogs
1 1/4 cups cake flour, sifted
1/4 tsp baking powder
1/4 tsp salt
1 tbsp cocoa powder
1/4 cup unsalted butter, at 

   room temperature
3/4 cups granulated white sugar
1 large egg
1/2 tsp vanilla extract
1/2 cup buttermilk
1 tbsp liquid red food coloring
1/2 tsp white distilled vinegar
1/2 tsp baking soda

1. Preheat oven to 350
°F and line 
    12 muffin tins with paper 
    cupcake liners.

2. In a large bowl sift together the flour, baking powder, salt, and cocoa
    powder.

3. In a second bowl of your electric mixer, or with a hand mixer, beat 

    the butter until soft (about 1-2 minutes). Add the sugar and beat until
    light and fluffy (about 2-3 minutes). Add the egg and beat until 
    incorporated. Scrape down the sides of the bowl. Add the vanilla 
    extract and beat until combined.

4. In a measuring cup whisk the buttermilk with the red food coloring. 

     With the mixer on low speed, alternately add the flour mixture and
     buttermilk to the butter mixture, in three additions, beginning and 
     ending with the flour.  

5. In a small bowl, combine the vinegar and baking soda. Allow the 
    mixture to fizz and then quickly fold into the cake batter.

6. Working quickly, divide the batter evenly among the 12 muffin cups 

     and smoothen the tops with an offset spatula or the back of a spoon. 
     Bake for 18 - 23 minutes, or until a toothpick inserted in the center 
     of the cupcakes comes out clean.

7. Cool the cakes in their pans on a wire rack for 10 minutes and them 

     remove from pan. Let cool completely before frosting. 

Cream Cheese Frosting:
 
8 oz cream cheese, room temperature
1/2 tsp pure vanilla extract
1/2 cup confectioners' sugar, sifted
2/3 cup cold heavy whipping cream (double cream) (35-40% butterfat)


In the bowl of your electric mixer, or with a hand mixer, beat the cream cheese until smooth. Add the vanilla and confectioners sugar and beat until smooth. Using the whisk attachment, gradually add the heavy cream and whip until the frosting is thick enough to pipe. Add more sugar or cream as needed to get the right consistency. 

*Red Velvet Cupcake: Joy of Baking blog 
 

Tuesday, December 27, 2011

Siopao Asado (Steamed Pork Buns)

Copyright 2011 LtDan'sKitchen blogs
This is my second post for this treat but the recipe is from a different source since I'm still not satisfied with my original favorite recipe which came from Brian Boitano's show. The dough was soft and squishy but after it has cooled down, it tends to harden and I like my pork buns still soft and doughey even when at room temperature. This new recipe comes from another blog, Panlasang Pinoy, that have become a favorite of mine just to check if I'm going in the right direction in terms of authentic Filipino dishes. I usually stick to my own personal preference on most dishes but when it comes to steamed pork buns, I had to rely on the recipe posted since I rarely make this back home. It was a lot easier to buy it in the market or the mall to really bother making them at home. 

Copyright 2011 LtDan'sKitchen blogs
The inducement came from my nephew Marky who kept asking for this and so Uncle Dan had to find a recipe to meet the need. I have to say, this recipe turned out to be quite really good. Heck, it was fantastic. Of course, I had to tweak the recipe for the filling but the dough itself is wonderful. Very soft and squishy, they way pork buns should be. The filling is Pork Asado which is  braised pork in a sweet sauce. I am partial to this filling since there is also the meatball filling with Chinese sausage that is equally popular back home.

Siopao Asado (Steamed Pork Buns) - Adapted*

Dough:
2 cups warm water
2 ½ tbsp sugar (for the yeast mixture)
½ cup sugar
1 pouch dry yeast
5 cups all purpose flour
1 ¼ tbsp baking powder
6 tbsp shortening or lard

Asado Filling:
2 lbs pork, chopped into small pieces
1 tbsp lard or shortening
2 tbsp garlic, minced
1 large onion, minced
2 tbsp cornstarch, diluted in 1/4 cup water
1 tbsp soy sauce
4 tbsp brown sugar
4 tbsp oyster sauce
2 tbsp Hoisin sauce
salt and pepper
4 hard-boiled eggs, quartered

1. Heat the shortening in a pot over medium heat. Saute the garlic and 
    onions and season with salt and pepper. Cook until softened. 

2. Add the pork and cook until it loses its pink color. Add the soy, oyster, 
    and Hoisin sauces, and sugar. Mix well and simmer for 40 minutes at low 
    heat.

3. Dissolve the corn starch in water and add to the pork mixture until the 
    sauce becomes thick. Check for flavor and set aside to cool.

4. While the filling is cooling, make the dough. In a glass bowl, add the 
    yeast to the warm water (around 110°F). Add the sugar and mix well.  
    Leave the mixture for 10 to 15 minutes or until you see bubbles forming.

3. Add the flour, baking powder, shortening (or lard) and 1/2 cup sugar into 
    the yeast mixture and mix well. Knead until the dough comes together 
    and is tacky but not sticky. You may have to add more flour to reach this 
    point but add only small amounts. 

4. Cover the bowl let the dough rise for at least an hour in a warm place 
    until it doubles in size. Punch it down and let it rise again for another 
    hour.
 
5. Dust the dough with a handful of flour and knead just to incorporate. Cut 
    dough into 12 portions.  

Copyright 2011 LtDan'sKitchen blogs
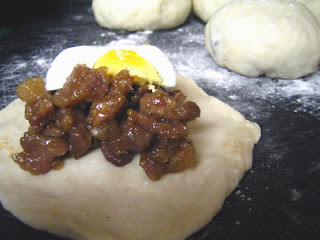
6. To fill, flatten the
    dough until a round 
    shape is formed using 
    a rolling pin. Put about
    2-3 tbsp of the asado
    filling and a slice of
    egg in the middle of 
    the flattened dough  
    and gather the edges
    towards the center 
    to seal. Line with a 2x2 
    square of wax paper to 
    protect the buns from 
    sticking. Do the same
    for the rest of the dough.

7. Place the buns in a steamer and steam in batches for 15 minutes. They 
    will double in size so make sure you leave enough room for the buns to 
    expand. Serve warm. 

*Siopao Asado: Panlasang Pinoy blog
 

Lou Malnati's Italian Salad Dressing

Copyright 2011 LtDan'sKitchen blogs
During my trip to Chicago, I was able to dine at Lou Malnati's, the founder of the deep dish pizza that is a trademark of Chicago. It was a revelation because my first taste of deep dish pizza was from a restaurant along the seedy part of Lakeshore Drive and well, it tasted like dough with red sauce over it. Lou Malnati's deep dish pizza however tasted like freshly made pizza and you can definitely tell and taste the difference. The crust was crunchy and the sauce is peppered with real tomatoes and the toppings were just the right amount. In a word: perfection. 

Another dish we feasted on was Lou Malnati's signature salad. This was my request since I was on meat overload which tends to happen when I visit my cousins. In an effort to offset this meat imbalance on my diet, I requested for a salad and this is what we ordered. The salad was again in a word: perfection. The salad had romaine lettuce, sliced button mushroom, black olives, crumbled bacon bits, diced tomatoes and parmesan cheese. What made this salad extraordinary is the dressing. It is a bit on the sweet side but the saltiness of the bacon and the tartness of the the cheese balanced the flavors that made it just irresistible.

In a twist of fate, the minute I arrived from my cousin's house a few days earlier, she showed me a salad tray from their party and she told me it was the best salad she ever had. Since all I saw were layers of vegetables, I was none too impressed. It was only later on that I realized that we were talking about the same salad. It then became a quest by the blogger in me to hunt down the recipe. Luckily enough, it is available on Jake Parrillo's blog which featured the very same dressing that I was looking for.

The recipe was published in a newspaper article in the 60s and although they gave the ingredients for the dressing, the exact proportions were left out so I'm grateful for Jake Parrillo for figuring out a recipe that had exact measurements. I still had to tweak it a bit since I used a different wine but the result was amazing. One thing to note is that the recipe uses Burgundy wine and I used Cabernet Sauvignon. Pinot Noir whould have been a better choice but we were unfortunately at Walmart and the salesperson had no clue what I was talking about when I asked her about Burgundy wines and I was under time constraints while figuring out what to get to make the salad so I grabbed my trusted Cabernet Sauvignon. The recipe below makes enough for three giant bowls of salad or just gift the excess in pretty sealed jars to really good friends.

Lou Malnati's Italian Salad Dressing - Adapted*

2 1/4 cup extra virgin olive oil
1 1/4 cup red wine vinegar
1/2 cup Cabernet Sauvignon
1/2 tbsp black pepper
2 tbsp coarse salt
1 tbsp dried oregano
1/4 cup sugar

Combine all ingredients and whisk with a wire whisk or blitz in a blender. The original recipe uses Burgundy wine so you may need to adjust the amount of sugar used if you find a Burgundy wine. The original recipe uses 1 tbsp sugar but I could not get the right flavor of the salad that we had so I added more sugar until it tasted just exactly like the salad I had a few days ago. 

The salad itself has the following ingredients:

1-2 Romaine lettuce, diced into 1-inch shreds
1 cup sliced black olives
1 cup Roma tomatoes, deseeded and diced into small pieces
4 cups diced mushrooms, button and Cremini
8 oz bacon, fried to a crisp, cooled, and crumbled
1 cup Parmesan cheese, grated
1/2 cup chopped walnuts
 
The Cremini mushroom is my own addition since button mushroom to me is as generic as eating paper for fiber. To prepare the salad, combine all the ingredients except the last three and dress with about a third of the dressing. Add the bacon, walnuts and cheese and combine just to mix. Serve right away. Parmesan shavings makes a great garnish to the salad. 

*Lou Malnati's Italian Salad Dressing: Jake Parrillo's blog 

Sunday, December 25, 2011

Christmas Lunch 2011

Beef Short Ribs in Hoisin Sauce with Canadian Whiskey
Copyright 2011 LtDan’sKitchen blogs

I made this dish some time ago using regular beef ribs and Bass beer to braise the beef. For our Christmas lunch, I made this dish once again but with short ribs this time that my cousin had in her freezer and using 12 fluid ounce of Black Velvet Canadian Whiskey and I have to say, the dish came out really great, much better than when I used beer to braise the beef. I do suggest you give this a try since you can barely taste the alcohol after cooking it for over 2 hours plus an additional 30 minutes more once you add the Hoisin sauce. By then, all the alcohol has evaporated and you are left with a very mild smokey flavor which I think is just perfect for this cut of meat.

Copyright 2011 LtDan'sKitchen blogs
Another repeat offender is the Triple Chocolate Cheesecake. Working with limited equipment, I had to make do with what is available and it was still as good as it always has been. I have to admit, it will be very hard to tire of this dessert. It simply is just divine. For really special occasions, this dessert will definitely not disappoint. The trick is to use really good ingredients and you end up with something out of this world. I do hope that one of you brave souls do give this dessert a try.  

Well, that's it for now. From my kitchen to yours, Happy Holidays!

Saturday, December 24, 2011

Persimmon Pudding

Copyright 2011 LtDan'sKitchen blogs
Another dessert I want to make is persimmon pudding. After reading the wiki page about persimmon, part of the entry on the culinary uses of the fruit mentioned persimmon pudding as a very popular dessert in the 70s but is not quite as popular now as it once was. That stoked my interest in trying out this dessert if I can find a good recipe since it reminded me of tiramisu which was also considered as a very outdated dessert which to me is total and utter rubbish.

Copyright 2011 LtDan'sKitchen blogs
I'm using an 8-inch springform pan to make this dessert instead of a regular 9x9 cake pan. It will make it easier to remove the cake once baked. I also think that whipped cream is a wonderful topping to this dessert and I really cannot just wait to try out and see how this dessert tastes like. Of course, if you have vanilla ice cream, that would be great too. The recipe is adapted from a new blog I found while searching for a recipe to use. I was intrigued and amused by her background story for the pudding that I was sold even before I finished reading her post. 

Persimmon Pudding - Adapted*

Copyright 2011 LtDan'sKitchen blogs
2 cups fresh Hachiya 
   persimmon pulp, peeled
1/2 tsp baking soda
1/2 cup sugar
2 cups flour, sifted
1 tsp baking powder
1/8 tsp salt
1 tsp cinnamon
1/8 tsp freshly grated 

   nutmeg
2 cups milk
1 egg
1 tbsp melted butter, 

   plus more to butter pan

1. Preheat oven to 350°F. Grease an 8-inch springform pan and line with 
    wax or parchment paper. Set aside.

2. In a bowl, mix the baking soda and sugar with the persimmon pulp and 
    set aside. 

3. Add the flour, baking powder, salt and spices to the persimmon mixture 
    and mix until flour is just incorporated.

4. Add the milk, egg and butter to the persimmon and flour mixture. Pour 
    into the prepared pan.

5. Bake for 1 hour. Allow to sit at room temperature for 30 minutes before 
    serving. 


Danish Parsley Chicken

Copyright 2011 LtDan'sKitchen blogs
Another Danish dish, the original recipe calls for Cornish hen. However, I've seen recipes where they use roasting chicken for this dish which is what I ended up using for this version. The recipe is written by Mimi Sheraton and published in the New York Times as a recipe for the winter season. I have tried looking for any historical information about this dish but my search led me nowhere. Still, this dish is really good and makes a wonderful addition to any Christmas holiday feast. 

Danish Parsley Chicken - Adapted*

3-4 lbs roasting chicken
2 to 3 tsp salt or as needed
1/2 cup unsalted butter
1 large bunch parsley with stems, washed and drained
1 cup water
1 1/2 cups heavy sweet cream

1. Preheat oven to 350°F. Season chicken inside and out with salt. Divide 
    butter in half and put half a piece inside the chicken. Pack the cavity 
    with a about a cup of parsley. Close cavity with skewers or truss.

2. Heat remaining butter in Dutch oven or deep pot until foam subsides. 
    Brown chicken, using wooden spoons to turn, until golden brown all over, 
    about 15 minutes ending up with the breast side up. 

3. Add 1 cup water to deglaze the brownings and bring to a boil. Simmer 
    covered for about 45 minutes or until the chicken is almost falling off 
    the bones. Remove chicken to heated platter. Remove trussing and 
    discard parsley.

4. Pour cream into the pot with the cooking juices and bring to a boil, 
    stirring and scraping up brown bits. Cook until the sauce has thickened 
    over medium high heat. Pour into heated sauceboat.

5. Serve chicken whole or carved with sauce on the side. Boiled new 
    potatoes are a traditional accompaniment.

* Sheraton, Mimi; Braising: An Ideal Cooking Technique For Winter Fare, The New York Times: February 2, 1983

Persimmon Bread

Copyright 2011 LtDan'sKitchen blogs
As part of the Christmas celebration, I'm making persimmon bread. This is not really part of the Christmas feast but rather more of an everyday snack for my nieces and nephew and well, a treat for me. The baking part is what I'm really interested in but given that the recipe I'm using is from Dave Lebovitz, then I'm really excited to try this one out. 

Hachiya Persimmon with Asian Pears
Copyright 2011 LtDan'sKitchen blogs
 
If you read my post about persimmon, I mentioned that I am partial to the Jiro persimmon as my favorite to eat as a fruit and I was lucky since the Hachiya variety is actually not suited to be eaten as such. The latter has to be really ripe due to its more abundant amount of tannin so it has to ripen to mellow out the astringent flavor of the unripe fruit. It is thus better suited for cooking. The Jiro variety on the other hand is best suited to be eaten as a fruit and as an ingredient in salads even when not fully ripe. 

The recipe is adapted by Dave Levobitz from James Beard and I'm writing it down again with the ingredients I chose for my version. I'm really giddy with excitement because the fruit by itself tastes really good so my expectations are a bit high for this sweet bread. I'm quite lucky that the store me and my cousin went to had large Hachiya persimmon and they were very much ripe which makes them perfect for baking. It is also good that my cousin is willing to try my culinary experiments although I'm quite sure that she will love this too since she loves persimmons as well.

Persimmon Bread - Adapted*

Copyright 2011 LtDan'sKitchen blogs
3½ cups flour, sifted 
1½ tsp salt
2 tsp baking soda
1 tsp ground nutmeg
2 to 2½ cups sugar
1 cup unsalted butter, 

   melted and cooled to 
   room temperature
4 large eggs, at room 

   temperature, lightly 
   beaten
2/3 cup Black Velvet 

   Canadian Whiskey
2 cups persimmon puree 

   (from peeled squishy-soft Hachiya persimmons)
2 cups walnuts, chopped
2 cups dates

1. Butter 2 9x5 loaf pans and dust with flour and tap out any excess. Preheat 
    oven to 350°F.

2. Sift the first 5 dry ingredients in a large mixing bowl. Make a well in the 
    center and stir in the butter, eggs, liquor, and persimmon puree. Mix
    well. Add the nuts and raisins and mix until just incorporated.

3. Divide batter into the prepared pans and bake for 1 hour or until 
    toothpick inserted into the center comes out clean.

Note: The breads will keep for about a week, if well-wrapped, at room temperature. They take well to being frozen, too.


Thursday, December 22, 2011

Cheese Pimiento

Copyright 2011 LtDan'sKitchen blogs
Another recipe down memory lane is Cheese Pimiento. My cousin wanted to buy ready made Cheese Whiz with pimiento for my nieces and nephew but I told her we should just make it from scratch. I then racked my brain as to how I used to make this dish when I was in grade school during my birthday parties. Yep, I make my own sandwiches to serve at my birthday parties. This sandwich spread is definitely an old favorite of mine and we used to make these every time we had a party in the house. I just totally forgot about it until now. 

There are only three ingredients to make this spread. Two are not really the healthiest ingredients and the third, well, it is but is not enough to balance out the other two. First up is the cheese. No fancy cheese required here. In fact, what you need is the easy melt cheese of the Velveeta variety, about a pound. Next ingredient is 4 oz of diced pimiento. They sell them in bottled jars right now so that makes your life a bit easier. Do not, however, buy the roasted pepper kind. Last but not least, 1/4 cup of condensed milk. This is to sweeten the spread as well as to moisten it and allow the peppers to blend well into the mushy cheese. After grating the cheese in the large grate of a box grater and mixing well with the rest of the ingredients, the spread is ready to be used on your favorite bread. Ah, to be 12 again!  

Addendum:
Copyright 2012 LtDan'sKitchen blogs
I made a new batch the day after I arrived back to Montana but I used a different recipe that added mayonnaise to the spread and sadly, it was not my favorite. The simple version I posted above is actually better in terms of flavor and texture. Adding the 2 tablespoons of mayonnaise required the addition of more condensed milk to balance out the saltiness. It however ended up a bit watery so I had to let it rest in the fridge overnight and by then, it reached the right consistency for spreading on a piece of white bread. It has this salty undertone which to me distracts from the overall flavor of the spread. 

Pichi-pichi and Kutsinta

Kutsinta
Copyright 2011 LtDan’sKitchen blogs
This Christmas proved to be a trip back to memory lane and a good one at that. I'm spending Christmas with my cousin and her family at Waukegan, IL and today, we stopped by a to-go place for Filipino food, a life-saver to most Filipinos here during this time of the year. It takes just one call and you can reserve a tray of whatever dish you want to serve for whatever party you may have. For me and my cousin, she bought a few dishes for dinner and also a few traditional snacks very common back home. When I say traditional, I mean made with traditional ingredients like coconut milk, coconut meat, rice or cassava flour to create what is truly a Filipino treat. 

First up is kutsinta (brown rice cake). It is kinda gross looking if you do not know what this dessert it. A bit slimy looking as well and with the consistency of jello, this dessert is made with rice flour, lye (yes, sodium hydroxide) and sugar. This is traditionally topped with freshly grated coconut meat. Very, very tasty, I don't even dare make this since I'm really scared of using lye because it has to be in perfect proportion for this dessert to work. They make this back home with nary any measurement and the result is always a treat. This is one of those dying breed of desserts that is now relegated during the season close to All Soul's Day all the way towards Christmas. They are definitely available throughout the year but cafes serving cakes and pastry are favored most times of the year. 

Pichi-pichi
Copyright 2011 LtDan’sKitchen blogs
Another traditional dessert treat is the pichi-pichi. A dessert also made with lye, this was a favorite of mine while still in college. Made with grated cassava and steamed in baking molds, this glutinous dessert is also a feast for the mouth. We had a research associate in the lab that lived in a place where they make this fresh everyday and we would request him to buy a big packet for us to eat when we plan stay overnight in the lab. Sadly, it never lasted until the afternoon since we kept eating it. It was just addictive. 

For those who are adventurous enough to give this a try, here is a link which describes how these two desserts (kutsinta and pichi-pichi) are made. I'm not really good at making traditional desserts unlike my Mom but even she never tried making these as well. We just never really had the need to make them since they were readily available in most vendors in the market and it was just easier to buy them all ready to be eaten than to take the time to actually make these definitely time-consuming treats.    

Tuesday, December 20, 2011

Christmas Truffles

Copyright 2011 LtDan'skitchen blogs
I concocted an ambitious plan about a month ago to make truffles and give them out as gifts for Christmas and it was indeed a brilliant plan. Sorry, I have been watching too many British shows lately. However, time nor strength was not on my side. I had the idea to play around with different chocolate glazes* as well as various types of truffles that included white chocolate truffles with cocoa nibs or coffee beans and flavored with Kahlua or Amaretto. I also planned to make Whiskey flavored truffles coated with white chocolate glaze and dusted with fleur de sel as well as regular chocolate truffles but instead of dusting with cocoa powder, I planned to glaze them with dark chocolate with a drizzling of white chocolate.

Copyright 2011 LtDan'sKitchen blogs
Fast forward to now, the reality is quite further form the original plan starting with the fact that I totally forgot that the recipe I had for whiskey truffles do not work at all. I've made this before and the truffle just never set to the right consistency and I had to throw it away which I did again wasting 2 lbs of good dark chocolate. I also fell short on the amount of glaze I bought so I decided to stick to one kind of truffle and just use whatever glaze I had. I also decided to ditch the white chocolate truffle and will save that maybe for next year or when I go to Chicago but at the last minute, I decided to go for it. 

Copyright 2011 LtDan'sKitchen blogs
The recipe I eventually used used is Ina Garten's chocolate Truffle recipe but changed the kind of chocolate and the liqueur that was used depending on the truffle that was prepared. For the chocolate truffles, I used Amaretto which is an almond-based liqueur and for the white chocolate truffles, I used Kahlua and Tennessee Whiskey with the cocoa nibs and coffee beans respectively. I did do away with the espresso on the white chocolate truffles to make sure they stay white in color and semi-sweet chocolate was used to glaze them. I glazed the chocolate truffles with both dark and semi-sweet chocolate as well as white chocolate and drizzled them all with white chocolate.

*I used the Wilton brand easy melt chocolate glaze which is prefect for candy making. It comes in different colors and kinds. Just don't overheat while melting or it will seize. 

Sunday, December 18, 2011

Chocolate Fudge with Pistachios or Walnuts

Copyright 2011 LtDan'sKitchen blogs
As part of my holiday gift package, I'm making chocolate fudge which is a first for me. I'm not really a fudge fan although I've had my fair share of fudge tasting every now and then. I'm making a simple version where it is not required that I do a song and dance while making the fudge. I say this because I've seen fudge prepared by a group of 6 or 8 men and women while doing a song and dance routine in specialty fudge shops at Frankenmuth, Michigan. I guess they attract more customers this way. While entertaining, I think me dancing alone in the kitchen says something else other than fudge making. 

Taken from a recipe in my cookbook, Chocolate Ecstasy, I'm quite excited to give this recipe a try. I'm just hoping it is as tasty as it looks on the picture in the book. The recipe calls for pistachios which is what I used for one of the batches while I used walnuts for the second one. This was not just to test which one is better but to offer some variety in the bag of home-made candy to be given away as gifts. 

Chocolate Fudge with Pistachios or Walnuts - Adapted*

Fudge with Walnuts
Copyright 2011 LtDan'skitchen blogs
1 cup sugar
1/4 cup butter
1 can condensed milk
1 tsp vanilla extract
4 oz semisweet chocolate
3/4 cup pistachios or walnuts

1. Grease and line an 8x8 
    pan and set aside. 

2. In a pot over medium 
    low heat, combine the 
    butter, sugar and milk 
    until the butter has melted. Continue to cook until the temperature 
    reaches 230°F. Stir occasionally. 

3. Remove from heat and add the vanilla. Stir very quickly. Add the 
    chocolate and the nuts and stir very well until the mixture is smooth. It 
    will start to set so work quickly and pour into the prepared pan. Smooth 
    the top and spread evenly. 

4. Once set but still warm, mark the squares with a metal spatula and allow 
    to cool completely. Cut into squares and store in an airtight container. 

Note: The soft ball stage is at 240°F but since I'm cooking in an elevated area, it comes a bit earlier so I ended up adding the rest of the ingredients at 230°F instead. 

*France, C., Chocolate Ecstasy, Sweet Water Press, Alabama: 1996. 

Battle of the Corn Breads

Copyright 2011 LtDan'sKitchen blogs
Cornbread is something I associate with chili con carne. Usually common in the south, cornbread has evolved from something very simple to the more fancy varieties. They are perfect for hearty stews and purists will argue that real southern cornbreads are best made with lard or bacon drippings and baked in an iron skillet and are also usually served with their signature barbecue. I have never been a big fan of both the smokey barbecue nor the cornbread until I tried Dave's Famous Barbecue's version of cornbread. If it were not for the calorie content, I can eat a bushel of these babies plus a whole garbage can lid-sized serving of beef tips. They are just to die for!  Well, literally for me, sadly. 

For my take on this southern staple, I found these two versions and both border on the sweetish side without going overboard. They hold their own to a rich and thick stew of chili con carne and the meeting of both dishes results in a well balanced meal in terms of flavor and texture. I'm also posting my version of chili con carne which is synthesized from a recipe featured on Ina Garten's show, Barefoot Contessa and from my favorite cookbook of main dishes, Main Dishes from Good Housekeeping. It is the perfect way to fend off the cold weather during the winter season.  

Grandmother's Buttermilk Cornbread - Adapted*

Copyright 2011 LtDan'sKitchen blogs
1/2 cup butter or lard
2/3 cup white sugar
2 eggs
1 cup buttermilk
1/2 teaspoon baking soda
1 cup cornmeal
1 cup all-purpose flour
1/2 teaspoon salt

1. Preheat oven to 375
°F. 
    Grease an 8 inch 
    square pan. 

2. Melt butter in large 
    skillet. Remove from heat and stir in sugar. Quickly add the eggs and 
    beat until well blended. 

3. Combine buttermilk with baking soda and stir into mixture in pan. Stir 
    in cornmeal, flour, and salt until well blended. Pour batter into the 
    prepared pan.

3. Bake for 30 to 40 minutes, or until a toothpick inserted in the center 

    comes out clean.

Copyright 2011 LtDan'sKitchen blogs
Golden Sweet Cornbread - Adapted**

1 cup flour
1 cup yellow cornmeal
2/3 cup white sugar
1 teaspoon salt
3 1/2 teaspoons baking powder
1 egg
1 cup buttermilk
1/3 cup vegetable oil


1. Preheat oven to 400°F. Spray or lightly grease a 9-inch round cake pan.

2. In a large bowl, combine flour, cornmeal, sugar, salt and baking powder. 
    Stir in egg, milk and vegetable oil until well combined. Pour batter into 
    prepared pan.

3. Bake in preheated oven for 20 to 25 minutes, or until a toothpick 
    inserted into the center of the loaf comes out clean.

* Allrecipes.com
** Allrecipes.com 

Beef Chili - Texas Style

Copyright 2011 LtDan'sKitchen blogs
My concept of Chili involves chunks of beef and white beans but I have been lately introduced to a version of Chili where it is all meat. This is what is referred to as Texas style. I must have watched chili cookoff shows a lot more than necessary because I'm now leaning towards the pure beef chili as opposed to the TexMex version of the dish with beans. I also watched an episode of Barefoot Contessa a couple of months ago where she featured the award-winning Chili Con Carne recipe of her friend, Devon, where coffee and basil leaves were two ingredients that were added to the dish to give the traditional version a twist. That recipe also had beans and I have made it once minus the beans and it was actually pretty good. 

This version I'm presenting is a combination of the Texas-style chili and partly Devon's award winning recipe in a "taking the best from both recipes" type of situation. This is something that is definitely worth a try especially during this winter season. Served with a semisweet version of corn bread, this thick spicy stew is just perfect in its simplicity. Hold off or use less of the cayenne pepper if you cannot stand the heat. Also, if you do have the urge to add more toppings, I suggest a mound of shredded Pepper Jack or Mozzarella cheese and a sprig of cilantro. 

Beef Chili - Texas Style

Copyright 2011 LtDan'sKitchen blogs
3 lbs beef cubed in 1-inch size
1 onion diced
3 garlic cloves, minced
2 green peppers, diced
2 28-oz canned diced tomatoes
2 cups beef broth
1/3 cup tomato paste
2 Serrano peppers, seeded and diced
1/3 cup chili powder (Chili, Hatch New Mexico and pepper flakes combo)
1 tsp cayenne powder
1 tsp oregano
1 tbsp espresso powder
1 tsp cumin
4 tbsp olive oil

1. In a large pot over medium high heat, brown the beef cubes with 2 tbsp 
    of olive oil. Do this in batches. Set aside. 

2. In the same pot, add the remaining olive oil and saute the garlic, onion, 
    Serrano and green peppers until softened. Season with salt and pepper. 

3. Add the chili powder, cayenne powder, oregano, cumin and espresso 
    powder and saute for one minute. Add the diced tomatoes and the 
    browned beef and season with salt and pepper.  

4. Add 2 cups of beef broth and bring the stew to a boil. Lower the heat 
    and simmer covered for 1 hour. Add the tomato paste and continue to 
    simmer until the beef is tender. Serve with shredded cheese and a sprig 
    of cilantro.