Recipes

Friday, September 23, 2011

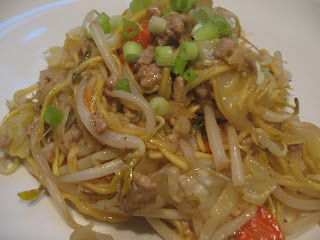
Weekday Stir Fry

Copyright 2011 LtDan'sKitchen blogs
It is one of those nights when you have no leftover food in the fridge and you come home from work hungry and you have no time to prepare an elaborate meal and yet, one has to eat. So what do you do? If you are like me and you keep random ingredients in the cupboard and the pantry, you make a stir fry dish and this is what I came up with. I had a packet of chow-mien noodles but it was not enough to make a noodle dish so I made it as one of the ingredients. You can definitely use more noodles than was used in the recipe but remember to adjust the liquid component as well as the flavorings depending on how much noodles you used. 

Weekday Stir Fry

1 lb ground pork
6 oz dried Chow-mien noodles
2 cups shredded cabbage
2 cups bean sprouts
3 small carrot, peeled and sliced thinly
1 small onion, sliced thinly
3 cloves garlic, minced
2 cups water
2-3 tbsp oyster sauce
1/2 tsp sesame oil
1 tsp soy sauce
chopped green onions for garnish
salt and pepper
2 tbsp canola oil

1.  Heat oil over medium heat in a large saute pan. Saute the garlic and  
     onion until softened. 

2. Add the pork and season with salt and pepper. Cook until it loses its pink 
    color. Add the soy sauce and mix. 

3. Add the water and cover to boil. Once boiling, add the cabbage and the 
    carrots and cook for 2 minutes or until the vegetables are half cooked. 

4. Add the noodles and mix well to moisten them. Cover the pan and simmer 
    until the noodles are cooked. This might take another ten minutes. Check 
    regularly and move things around to prevent the noodles from sticking at  
    the bottom. 

5. Add the bean sprouts and the oyster sauce. Mix well. Off the heat, drizzle 
    with the sesame oil and garnish with the green onions.  

Tuesday, September 13, 2011

Creme Brulee

Copyright 2011 LtDan'sKitchen blogs
Creme Brulee is one of my favorite non-chocolate dessert and the good thing about it is that it is very easy to make. The ingredients are similar to a milk flan but instead of milk, you want heavy cream with the highest amount of milk fat that you can find. The higher the fat content, the more luxurious your brulee is. To caramelize the sugar topping, you can either use a small blowtorch or you can also use an ice bath while broiling the brulee on the topmost level of your baking rack. The ice water keeps the brulee from heating up as you caramelize the sugar. As much as I want to invest in a small blowtorch since it looks like fun, I think I'll stick to broiling my creme brulee. 

Copyright 2011 LtDan'sKitchen blogs
Creme Brulee

6 egg yolks
1 large egg
3 cups heavy cream
1/2 cup white sugar
1 tbsp turbinado sugar for   each serving
1 tsp vanilla extract
1 tbsp coffee liqueur   (orange liqueur if you   prefer)

1. Preheat oven to 300°F.     In a glass bowl, whisk the egg yolks and egg and the white sugar until just     combined.

2. In a hot saucepan, scald the cream until warm but not boiling. Add to the 
    egg mixture and whisk until combined. Add the vanilla and the liqueur. 

3. Pour the brulee into 5-6 ramekins until almost full and bake for 40 
    minutes in a water bath or until the top is set when gently shaken. Make 
    sure that you use hot water in the bath and that the water comes up
    halfway the sides of the ramekins. 

4. Remove the remekins from the bath and cool to room temperature,  
    before cooling in the fridge overnight. 

Copyright 2011 LtDan'sKitchen blogs
5. Prior to serving, top  
    the brulee with a tbsp 
    of turbinado sugar. In a 
    baking pan with ice 
    water, broil the brulee 
    for about 10 seconds. 
    Make sure that you  
    keep an eye on it and  
    that you don't burn  
    the sugar. Remove 
    from the broiler and 
    let it rest for a minute 
    before serving.

Sunday, September 11, 2011

Dessert Crepes

Copyright 2011 LtDan'sKitchen blogs
I wrote this on the fly to make up for the delay in the dessert posting for this week. I've had this recipe for a while now and I actually made this dessert a couple of months ago but I'm glad I took pictures knowing I was going to need it at some point. 

Here then is Cedric's version of sweet crepes that I initially converted into a savory version and filled with a vegetarian filling. There is not much to the recipe other than to mix and to let it rest prior to cooking. The filling varies depending to taste but he prefers a combination of Nutella hazelnut spread and fresh berries. For my version, I used a combination of equal amounts whipped creme fraiche and Nutella with fresh raspberries. 

Dessert Crepes

4 cups flour
5 large eggs
5 tbsp sugar
2 cups milk
2 cups unfiltered beer
unsalted butter

1. Mix all the ingredients except the butter in a big bowl. Let sit for 20 
    minutes.

2. Over medium low heat, butter a non-stick skillet and add a ladle full of 
    the batter. Spread it around quickly and let it cook until the edges are 
    set and curls up a bit. 

3. Flip the crepe and cook for another minute. Slide onto a plate and cook 
    the rest of the batter. 

4. Fill with your choice of toppings and garnish with a dusting of powdered 
    sugar. 

Risotto con Piselli (Risotto with Peas)

Copyright 2011 LtDan'sKitchen blogs
I needed a good side dish to serve my Stracotto with and risotto came to mind but I wanted to try something new aside from my usual favorite risotto recipes. This risotto recipe is actually a healthy full meal by itself, flavored with bacon, it incorporates other vegetables and not just peas. The cooking process is slightly different for this risotto since you cook the vegetables into a thick stew before adding the rice. I have made some changes to it as I prefer to add the fresh herds at the very end and since I'm using frozen peas, I also prefer to add them at the very last minute. 

The recipe is from Sophia Loren's cookbook and is something I'm glad I tried. One thing you will need though is a vegetable slicer that allows you to make paper thin slices. Zucchini is a major part of the dish but in paper thin thickness, they blend quite well into the dish without overpowering it in terms of flavor or texture. 

*Risotto con Piselli - Adapted

3 oz bacon, diced
1 medium onion, diced
1 carrot, peeled and diced
1 tbsp chopped parsley
1/2 tsp dried tsp basil
1 lb fresh or canned diced tomatoes
2 medium zucchini, sliced thinly
1 cup frozen peas
1 1/2 cup Arborio rice
Salt and pepper
2-4 cups chicken broth
Parmegiano Reggiano, grated
olive oil

1. Brown the bacon in a deep sauce pan over medium heat. Add the onion 
    and carrots and cook for about 5 minutes. 

2. Add the tomatoes and stir until it slightly thickens. Add the zucchini and 
    cook down until the liquid has almost evaporated. 

3. Add the rice and cook according to risotto basics, gradually ladling in the 
    broth until the rice is tender. 

4. Add the herbs and the frozen peas at the last addition of the broth. check 
    for flavor and season with salt and pepper. 

5. Sprinkle with the cheese and drizzle with olive oil prior to serving.

*Loren, Sophia. Sophia Loren's Recipes and Memories. GT Publishing Corp. New York:1998

Stracotto

Copyright 2011 LtDan'sKitchen blogs
I have this recipe in my computer and I don't recall ever making this dish. I must have made this at some point if I saved it in my computer and made sure I had a backup copy. I had quite a few too many a dinner party while living at Emory and this must be one of the dishes I served up to my friends. Despite going blank on where this recipe came from, I'm going to give this one a try and I'll leave it uncredited.  Looking at other stracotto recipes online, I decided to update the recipe I have on hand so now, it is a synthesis of several recipes and I should be under no obligation to give credit to anyone else. 

Stracotto is really nothing more than pot roast but cooked Italian style. The herbs used, rosemary and thyme, are very Italian and the simple flavors really play up the authenticity of this Italian dishes in terms of simplicity and taste. Dried Porcini mushrooms give this dish an intense earthy flavor which I think works really well. The dish can be served with plain pasta or polenta but I thought, a good hearty risotto is the perfect partner to this simple dish. 

*Stracotto - unknown

1 (4-pound) boneless beef chuck roast
Salt and freshly ground black pepper
3 tablespoons olive oil
2 onions, sliced
6 garlic cloves, coarsely chopped
1 cup dry red wine
1 cup beef broth
1/2-ounce dried porcini mushrooms
1/2 tsp rosemary
1/2 tsp thyme
2 tbsp butter
2 tbsp flour

1. Reconstitute the Porcini mushrooms in one cup hot water. Set aside. 

2. Pat the beef dry with paper towels. Sprinkle the beef generously with salt 
    and pepper. Heat 2 tablespoons olive oil in a heavy 6-quart roasting pan 
    over medium high heat. Add the beef and cook until browned on all sides, 
    about 15 minutes total cooking time. Transfer the beef to a bowl. 

3. Lower the heat to medium and add remaining tablespoon oil to the pan. 
    Add the onions and saute until tender, scraping up the brown bits on the 
    bottom of the pot, about 5 minutes. Add the garlic and saute 1 minute 
    more. Deglaze with the wine for one minute. 

4. Add the broth, the dried herbs and mushrooms (with the reconstituted 
    liquid) and return the beef to the pan. Bring the liquids to a boil. Cover 
    and simmer over low heat and braise until the beef is fork-tender, 
    turning the beef over halfway through cooking, about 3 hours.

3. Transfer the beef to a cutting board. Tent the beef with foil and let 
    stand 15 minutes. Meanwhile, spoon any excess fat off the top of the pan 
    juices. Transfer the pan juices and vegetables to a blender and puree until 
    smooth. Make sure you cool the sauce for about 10 minutes before 
    blitzing it. Combine the sauce with the butter and flour in a heavy 
    medium saucepan. Bring to a boil. Season the sauce, to taste, with salt 
    and pepper.

4. Cut the beef across the grain into 1/2-inch-thick slices. Arrange the sliced 
    beef on a platter and spoon the sauce over and serve, passing the 
    remaining sauce in a sauce boat

Empanada (Meat Turnover)

Copyright 2011 LtDan'sKitchen blogs
Empanada is a street food fare back home and is easily found whenever you go around town. The most common way these pastries are prepared is deep fried in oil since they are cooked on the sidewalks and having a thermally regulated oven is just highly improbable. This snack is more evidence of the the Spanish rule in the Philippines but is one aspect of the colonization that I do welcome (oppression and abuses aside). Traditionally cooked with chicken, I prefer to make mine with ground pork.

Copyright 2011 LtDan'sKitchen blogs
The snack is quite versatile in the sense that the filling can be tweaked depending on your preference for raisins, green peas and boiled eggs. I also prefer to bake these goodies since it tends to bring out the flakiness of the pastry dough. It gives it this lighter taste that you don't obtain when deep frying them. My Nanay Mercy makes these for the family and I have made my own version the last time I went home for a visit. The only difference between our versions is that I think in American portions when I cook (giant portions) and that I do bake my empanadas.

Empanada

2 package frozen pastry dough, thawed 
1 lb ground pork (or chicken and even turkey)
2 lb potatoes, pared and diced
1 small onion chopped
1/2 cup raisins
1/2 cup diced sweet red pepper
1/2 cup green peas
2 cloves garlic, minced
1 tsp soy sauce
salt and pepper to taste
2 tbsp olive oil
4 shelled boiled eggs, sliced into eighths
2 tbsp melted butter 

1.Saute garlic and onion in the oil over medium heat until softened. Season 
   with salt and pepper. Add the meat and sauté until meat is browned. 
   Season with salt. Add the potatoes and cook covered until potatoes are 
   just tender for about 15-20 minutes. Check every now and then to make
   sure it cooks evenly. Add the soy sauce, red peppers, green peas and 
   raisin and cook for about 2 minutes.  Adjust seasoning if needed and let
   cool.

2.Divide thawed pie dough into 4 and roll into balls. Flatten dough onto a 
   floured surface. Don’t make it too thin or it will fall apart.

3.Place two tbsps of the filling on one side of the dough and a slice of the 
   egg and fold the other side of the dough to form a crescent shaped pie. 
   Press edges with fork tines to seal. Do the same for the rest of the dough 
   and filling mix. Arrange turnovers on a cookie sheet lined with parchment
   paper. Brush with melted butter. 

4.Bake in preheated oven at 375°F for about 30-45 minutes or until pastry 
   dough is golden in color. Let cool and serve either warm or at room 
   temperature. 

Notes:

You can basically make around 8 to 10 turnovers/box of pie dough as there are 2 pastry dough per box. So you get 4-5 turnovers/dough.

I usually add a slice of boiled egg or if you can find boiled quail eggs, you can add half of a quail egg per turnover.

Empanada Filling
Copyright 2011 LtDan'skitchen blogs
The recipe above is very flexible. You do need the potato to act as a binder so don’t skimp on the potato. You can add more of the peppers, green peas or the raisin to taste. The red pepper gives it a sweet taste that you can’t get using green peppers so don’t substitute a green for the red pepper. You can also add more pork if you want it meatier.

Instead of melted butter, you can also brush the turnovers with milk. Do use a higher fat content of milk as you need the fat to achieve a golden brown color on the turnover during baking.

To cool them, I usually use a wooden chopping board. If you do have a cooling rack that has a tight mesh, all the better.

Thursday, September 8, 2011

Eggplant Fritters

Copyright 2011 LtDan'sKitchen blogs
Eggplants are fairly abundant back home. The common varieties we have are the Japanese and the small and round ones which is like a miniature version of the eggplants sold in the grocery stores here.  We usually cook them using a charcoal grill until the skin is charred. At that point, you peel off the skin and you either turn it into a cold salad by adding diced tomatoes and onions and seasoned with salt and pepper or you can turn the soft meat into fritters. Growing up, eggplant fritters are one of my favorite lunch meals with rice. The fritter itself is very simple and is prepared by adding an egg to the mashed grilled eggplant meat and flavored with salt and pepper. It is then fried over hot oil until golden brown. 

The eggplants here in the US are on the larger scale and the meat, though fleshy and having less seeds are on the bland side. To remedy this, I have adjusted my fritter recipe by adding Italian bread crumb mix to add more flavor to the fritter. You can either bake the eggplant at 350°F for about an hour until the skin if fairly browned or you can boil the eggplant which saves you some cooking time. Make sure that you poke some holes into the skin before baking or broiling though to ensure that the heat penetrates into the meaty flesh. Once cooked, you peel off the skin and mash the meat. For each eggplant, I add 1/3 cup of the Italian bread crumb mix, 1/4 cup of diced onions, a clove of minced garlic, an egg and season with salt and pepper. To fry, just add enough oil to cover the frying pan and at medium heat, fry the flattened dollops of the fritter mix until golden brown. Great eaten as is or served with steamed rice.

Schweddy Balls

Copyright 2011 LtDan'sKitchen blogs
One of my favorite regular guest host on SNL is Alec Baldwin. Coincidentally, one of my favorite sketches involves his character Pete Schweddy hawking his family products from rum balls to baseball wieners. Today, Ben and Jerry's unveiled their Schweddy Balls ice cream flavor in honor of the sketch and I, and I'm sure quite a few others as well, flocked to get hold of this new flavor to see and savor what it was all about. I myself bought two pints and after the first taste, I have to say it is very good. It is very adult in taste though. The fudge-covered rum and malt balls are quite intense. Very good rum flavor actually, even the vanilla ice cream base is flavored with rum as well. I say, give it a try. And, if you are curious enough and are wondering what's so special with the sketch, just go find it at Youtube. Make sure that you take a large dose of a wicked sense of humor though before watching.  

Monday, September 5, 2011

Tres Leches Cake - Latin American Version

Copyright 2011 LtDan'sKitchen blogs
Tres Leches Cake is one of those cakes that taste really good but is somewhat challenging. The process of soaking the cake in a dairy trifecta of cream, evaporated milk and condensed milk suggests a soggy mass in cake form but in reality, this cake is very light and perfectly moist. Another issue is how to contain all this liquid from oozing out without serving a cake that looked like it peed on itself (sorry, bleach that thought). The recipe is courtesy of Emeril Lagasse and although I don't usually watch his shows, I needed a recipe for this cake and he has two versions. I've made both of them but I think I prefer this second version. One consideration is that the cake is almost usually baked in a 9x13 baking pan but I prefer a round cake so I used a 10-inch springform pan. One worry I had was how the change in cake pans will affect the cake and indeed, I had to do some sculpting. The cake came out a bit uneven with the sides rising more than the center portion so I had to surgically even out the cake using a serrated knife before soaking it with the milk. The extra mounds were actually really good with a cup of hot coffee so no complaints there.

The first time I made this cake, it was too stressful for me thinking of ways to prevent this cake from "leaking" although it really was meant to do that. I prefer to bake a cake that presents itself well generating oohs and aahs while satisfying my guests at the same time. Although this cake did do just that, I had to tweak the recipe to contain the plumbing issues. To achieve this goal, I used only half of the soaking liquid and used only portions of it to soak the cake. The recipe below is  the second version that Emeril have on his show, is of Latin American origin and uses a lot less of the soaking liquid compared to the first recipe that I tried. The cake is also completed with a frosting of boiled icing instead of whipped cream. Of the two I made, I prefer this cake a bit more. 

*Tres Leches Cake -Adapted

Copyright 2011 LtDan'sKitchen blogs
2 cups all-purpose flour
6 large eggs, separated
2 cups granulated sugar
2 tsp baking powder
1/2 cup whole milk
1 tsp vanilla extract

Soaking liquid:
12 oz can evaporated   milk
14 oz can sweetened   condensed milk
1 cup heavy cream

Frosting:
6 tbsp water
1 1/2 cup white sugar
6 egg whites

1. Preheat the oven to 350°F.

2. Lightly grease and flour a 10-inch springform pan. Set aside. In a 
    small mixing bowl, sift together the 2 cups flour and baking powder.

3. In the bowl of an electric mixer fitted with a whisk attachment, 
    beat the egg whites on medium speed until soft peaks form. Gradually
    add 1/2 cup of granulated sugar with the mixer running, beating until 
    stiff peaks form. Transfer to another bowl. 

4. Mix the egg yolks with the remaining white sugar and beat on high until 
    triple in volume. Fold in the beaten egg whites. Add the flour mixture 
    to the batter in stages, alternating with the whole milk, beginning and 
    ending with the flour. Add the vanilla extract. 

5. Pour the batter into the prepared pan and place in the oven and bake 
    for 35 minutes, until a toothpick inserted into the center comes 
    out clean. Remove the cake from the oven and place on a wire rack 
    to cool for 10 minutes.

6. In a blender, combine the evaporated milk, sweetened condensed 
    milk, and 1 cup of the heavy cream. Cover and blend on high for 45 
    seconds. Save half of the milk mixture, cover, and refrigerate until
    ready to serve the cake. 

7. Pour 1/2 of the remaining milk mixture over the warm cake. When 
    the cake has soaked up most of the liquid, pour the remaining half 
    of the milk mixture over the cake, and cool to room temperature. 
    Cover and refrigerate until well chilled, at least 4 hours or 
    overnight. Make sure the top part of the cake is even. 

8. To make the frosting, boil the sugar with the water over medium low
    heat without stirring until it reaches 230°F on a candy thermometer. 
    When you are close to reaching this stage, whip the egg whites until 
    soft peak forms. Over medium speed, drizzle in the sugar syrup and 
    once added, raise the speed to high until  stiff peaks are formed. 
    Frost the cake and pipe rosettes if desired.   
9. Serve the cake with the reserved chilled milk sauce.

*Food Network Channels: Emeril Live: Latin Flavors episode: 2002

Chicken and Pork Mole de La Abuela Ramoncita

Copyright 2011 LtDan'sKitchen blogs
I've had chicken mole back in graduate school when my friend Luis invited us over for dinner at his apartment. Luis is Mexican from the town of Queretaro. It was my first foray into authentic Mexican food and it was quite an experience. Luis is quite the chef and it was the first time I also tried pickled cactus at his urging. I did not like it but it was not an unpleasant experience and I'm just glad I gave it a try. I just don't like pickled anything so it was not the cacti's fault. The mole sauce that he made though was really very good and I seem to remember asking for the recipe but it is all very fuzzy now so he might have a better answer as to why I did not get the recipe back then. 

I made my own version of Chciken Mole Poblano using Tyler Florence's recipe while at Emory. On a whim, I thought I'll send it over to Luis for him to check if the recipe is credible enough to pass as authentic as I planned to make chicken mole this weekend. Let me just put it this way, his first response was, STTOOOOOOPP! This was followed by, "I'll have my wife send you a real recipe of mole." That was good enough for me. While I patiently waited, I was not ready for the surprise that came my way when the recipe arrived. It was a lot more different than what I thought it would be. My idea of mole is a bunch of dried chilies reconstituted in broth and flavored with chocolate. I did not anticipate the inclusion of animal crackers, plantain bananas and lard. So, without further ado, I'm sharing the recipe that Luis and his wife, Teresa graciously shared with me that belonged to Teresa's Grandmother, Ramoncita.

Chicken and Pork Mole de La Abuela Ramoncita


Copyright 2011 LtDan'sKitchen blogs
6 dried poblano peppers (ancho)
4 dried pasilla chili (chili   con negra)
1 banana plantain
1 Fuji apple, peeled
1 1/2 cup animal crackers
3/4 cup raisins
1 tsp cinnamon powder
1/2 tsp anise seeds
1/2 cup sesame seeds,   toasted
1/2 cup skinless almonds,   toasted
1 cup peanuts, roasted
6 cloves garlic, peeled
1 onion, sliced
2 tbsp brown sugar
1 chocolate tablet
1/2 lb lard
2-4 tbsp vegetable oil
salt
2 lbs pork, cut in large pieces
4 lbs chicken, cut in large pieces

1. Cook the pork in water and season with salt and pepper and a clove of 
    garlic. Boil for about 30 minutes. In a separate pot, do the same for the 
    chicken. Set aside.  

2. Deseed the dried chilies and dry toast in a non stick pan over medium 
    heat. Be careful not to burn them. Once toasted, put in a glass bowl 
    and pour enough hot water the soak them, about 1 cup. Set aside. 

3. On the same pan, dry toast the onions and garlic until browned on both 
    side. Set aside.

4. In succession, dry toast the almonds, peanuts and sesame seeds. Set 
    them aside. Lastly, toast the anise seeds and the cinnamon for about 
    a minute. Set aside. 

5. On the same pan, add 2 tbsp of oil and fry the bananas and apples 
    until caramelized on both sides. You may have to do this in batches. 
    Set aside. Add 2 more tbsp of oil and fry the raisins. 

6. To make the chili paste, take the reconstituted chilies and the liquid 
    and put them in a blender. Blitz until you get a smooth paste. If you 
    need more liquid, use the pork broth until you achieve a thick dark 
    paste, about 2 cups. 

7. To make the spice paste, blitz the rest of the toasted and fried 
    ingredients. Use the pork broth to aid in the blending. You will end up 
    with about 8 - 10 cups of spice paste. 

8. In a deep sauce pot, warm the lard over medium heat. Once melted, 
    add the sugar and the chocolate tablet. Stir until the chocolate is fully 
    incorporated. 

9. Add the chili paste and mix. Lower the heat and simmer for about 15 
    minutes. Add the spice paste and simmer for another 30 minutes. Check 
    for flavor and correct with salt. 

10. In a large deep sauce pan, take about half of the mole and add about 
    1/2 cup of water to thin out the mole paste. Add the chicken and pork 
    pieces and simmer for another 15 minutes. The mole should have the 
    consistency of ketchup. Add more mole paste if needed. Garnish with 
    toasted sesame seeds and serve with Mexican rice. 

The mole paste you get from this recipe is more than you will need unless you are making a giant batch. You can freeze the rest of the mole paste. I doubled the recipe and I obtained a whole pot of mole paste which I plan to cook over the next few months. 
    

Mexican Rice

Copyright 2011 LtDan'sKitchen blogs
Mexican rice is the perfect accompaniment to the dinner I was preparing for my friends tonight. It has just enough flavor to hold its own and yet, it is subtle enough to not take away from the main dish. The process of cooking the rice is the same way that I usually cook rice be it regular or as a pilaf. The key to this dish is to make sure that the rice is sauted first before the liquids are added to prevent them from clumping when cooked.

The rice is usually cooked with tomato sauce but I prefer to used diced tomatoes and its liquid. It gives the dish a more organic feel and a much lighter texture and taste. 

Mexican Rice

3 cups white rice
1/2 cup diced onions
3 cloves garlic, diced
14 oz diced tomatoes
1 tsp chicken broth powder
2 tbsp oil
salt and pepper

1. Saute the onions and garlic in the oil at medium heat. Season with salt 
    and pepper. Add the broth powder and the rice. Saute until the rice has 
    absorbed the oil.  

2. Add the diced tomatoes and about 2 cups of water. Bring the liquids to a 
    boil uncovered. 

3. When the liquid has been mostly absorbed, cover the pot and lower the 
    heat to low and let it steam cook for about 30 minutes. 

4. Fluff with a fork and serve immediately. 

Cheese Enchiladas

Copyright 2011 LtDan'sKitchen blogs
Another Mexican dish I learned by watching my friend Luis cook is cheese enchiladas. The technique was the most important lesson that I learned from him since the rest of the ingredients were easy to come by. Canned enchilada sauce was available  in several brands ranging from mild to hot in terms of spice heat which was my saving grace until now. The filling was very simple and had only two ingredients. The choice of tortilla became important as I used to prefer flour tortilla but most of my Mexican friends seem to prefer the corn variety.

In the spirit of the Mexican dinner I was preparing for my friends, I figured, I'd prepare everything from scratch. The first order of business is the enchilada sauce. I found a recipe that was supposedly Mexican in origin so I started from there and made it my own by changing some of the ingredients. For the filling, I made the choice to add jalapenos and together with the onions, caramelized it slightly to enhance the flavor of the onions while playing down the heat from the peppers. The other important ingredient to this dish is the cheese. I usually prefer Mozzarella but in this instance, I used Queso Fresco which I really believe now is a lot better in terms of texture and flavor. Muy delicioso!

Cheese Enchiladas

Enchilada Sauce:
Copyright 2011 LtDan'sKitchen blogs
3 tbsp flour
3 tbsp California chili   powder
1 tbsp cocoa powder
salt
2 cloves garlic, minced
1 cup diced tomatoes
4 cups water
3 tbsp tomato paste
3 sprigs of fresh oregano   (1 tsp dried)

Filling:
2 cups diced onions
4 jalapeno peppers, deseeded and sliced thinly
1 1/2 lb Queso Fresco, shredded
2 tbsp oil
salt and pepper

24 6-inch corn tortillas

1. In a sauce pot, mix the chili powder, flour and cocoa powder. Add 3 cups 
    of water and mix well. Cook over medium heat until the mixture  
    thickens. Stir occasionally. 

2. Add the oregano, a tsp of salt, tomato paste, garlic and the remaining  
    cup of water. Simmer for another 10 minutes. Let cool for about 5 
    minutes and blitz in a blender. Check for flavor and adjust with more 
    salt. Set aside. You will get about 5 cups of sauce.

3. To prepare the filling, heat the oil in a medium saute pan. Add the onions 
    and peppers and season with salt and pepper. Cover and allow to 
    caramelize until slightly browned. Check and move the mixture around 
    every now and them to prevent them from burning. Set aside and cool. 
    Once cooled, add the shredded cheese.

4. In another saute pan, spoon about a cup of the sauce and at medium  
    heat add a tortilla to soften on both sides. Use a tong to lift the tortilla  
    out of the sauce and fill with about two tsbps of the filling mix. Roll and 
    lay on a baking pan that has been covered with a thin layer of the sauce. 
    Do the same for the rest of the tortilla or until all the filling has been used 
    up. You will end up with two 9X13 baking pans. 

5. Cover the baking pans with foil and bake for about 45 minutes at 350°F. 

Ensalada de Naranjas - Orange Salad

Copyright 2011 LtDan'sKitchen blogs
My Mexican friends used to serve a very simple salad made with lettuce and bits of cucumber. They dressed their salad simply with lime and olive oil. However, I needed a salad recipe that made use of oranges which I had in excess and I was pleased to find a recipe that is Mexican in origin and made use of oranges and cucumbers. The salad called for lettuce which I did not have but I do have organic spinach leaves so I substituted the spinach leaves for the lettuce. The salad is dressed with a French dressing which I spiced up with a jalapeno pepper.

*Ensalada de Naranjas - Adapted

4 oranges
1 cucumber
4 cups spinach leaves

Dressing:
1/4 cup balsamic vinegar
1 jalapeno pepper, deseeded and finely diced
1/4 cup green onions, diced
1 tbsp honey
1/2 lime
salt and pepper
1/4 cup olive oil + more if needed

1. To make the dressing, combine the vinegar, juice of lime and honey and 
    mix well. With a whisk, drizzle in the olive oil until a thick emulsion is 
    formed. Season with salt and pepper. Add the jalapeno and the onions 
    and mix well. Set aside. 

2. Peel the oranges and slice into rounds. Peel the cucumber and slice 
    crosswise into thin slices. Wash the spinach leaves. 

3. To assemble, arrange the spinach leaves on a wide bowl and top with 
    the orange and cucumber slices in a decorative manner. Drizzle with  
    the dressing and serve immediately. 

* Brown, H. E., Woman's Day Encyclopedia of Cookery: Volume 7, Fawcett Publications Inc., New York: 1966